 Closing the Gap in Direct Dentistry – treating black triangles, Class II restorations and peg laterals
Introduction
“It is amazing that we have billion dollar companies building space age stuff, but when it comes to the important business of restoring a tooth in a conservative way, we use tools that are 50 years old.” Dr David Clark, DDS.
This challenge set Dr David Clark, founder of the Academy of Microscope Enhanced Dentistry, on the road to inventing a new system of products. This is where his journey to transform the way dentists – and patients – approach restorative dentistry began.
His developments have empowered dentists to better develop their own unique practice philosophy, and ensure the delivery of a superior patient experience…
In 2009, Dr Clark founded Bioclear Matrix Systems, offering progressive products and techniques evolving from traditional preparations, as well as dental matrix systems for anterior and posterior composite restorations. The breakthrough gives dentists the tools and equipment to create longer lasting, stronger and aesthetically superior composites.
Diastema closure and large anterior restorations were the primary focus of the Bioclear matrices, which use anatomic shapes specific to the tooth’s surface.
But Dr Clark quickly discovered that the injection moulding process using these matrices, in conjunction with the right restorative material, also created a breakthrough new treatment possibility – treating challenging and unsightly open gingival embrasures, or ‘black triangles’.
With 30% of adults suffering from black triangles (1) the discovery was significant.
Until now, dentists have lacked the tools to confidently treat this aesthetic problem, and many of the solutions offered have been disproportionately aggressive. In the meantime, traditional restorative closures of black triangles have created additional problems, such as staining and periodontal inflammation.
Bioclear Matrix addresses this problem of unnecessarily aggressive restorative treatments, presenting a range of conservative solutions for treating black triangles, Class II restorations and peg laterals, as well as closing diastemas.
This new approach enables dentists to meet the needs of an increasingly demanding and well informed patient, at a time when aesthetic dentistry is a growing industry.
At Optident, we recognise the huge opportunity presented by this innovation. This is why we are currently the exclusive supplier of Bioclear Matrix products in the UK.
In this ebook we detail how you can address each of these problems. Armed with this knowledge, you’ll be able to transform your offering to patients while giving people what they demand and expect in a changing marketplace.
.png)
.png)
Contents
3 Treating Peg Laterals and Closing Diastemas
.png)
The Problem
Open gingival embrasures, or ‘black triangles’, are rated as patients’ third most disliked aesthetic problem, behind caries and dark crown margins(2) . They are widely agreed to be unsightly and can be linked to premature ageing, as well as causing problems to the health of the tooth as a result of excessive plaque and food accumulation.
Yet until now, dentists have lacked the confidence and the tools to successfully treat the problem in the conservative way craved by patients.
There has been no predictable, minimally invasive approach for treatment. Solutions offered have been very aggressive, such as full crowns, porcelain veneers, stripping of the teeth, or even pushing the teeth together.
Traditional restorative closures of black triangles have created additional problems too, such as staining, debonding, periodontal inflammation and food impaction.
Indeed, there are a number of common fallacies around treating black triangles with minimally invasive composite treatments, a problem which has led to many dentists carrying out aggressive treatments, or failing to treat the problem at all.
After spending time talking to many manufacturers and tens of thousands of dentists, Dr Clark compiled a list of his ‘top five’ myths, which have often steered dentists away from minimally invasive treatments, or made previous attempts unsuccessful.
These falsehoods shed light on why this area of dentistry is a missed opportunity, for both dentists and patients.
Busting five myths about minimally invasive treatments
Myth 1 – Acid etching cleans the tooth
False. Phosphoric acid barely touches plaque, instead removing the mineral rather than the organic component of tooth surfaces. Biofilm is tenacious, and is mostly organic rather than mineral. This residual biofilm at the margins is likely the number one reason why Class V and interproximal composites turn brown at the margins. No bonding agent can bond to biofilm, and most dentists leave biofilm on their hard to access margins.
Myth 2 – A stronger dentin bonding agent is the answer
False. Manufacturers keep selling new and improved dentin bonding agents with higher and higher dentin bond strengths. But in a case like this, most dentists are bonding to plaque, calculus and contaminated dentin, and no current resin bonds to biofilm.
Myth 3 – A full crown is better
False. A full crown destroys 70% of coronal tooth volume with a 10% to 20% chance of eventual resultant pulpal death.
Myth 4 – A porcelain veneer is better than bonding
False. Porcelain veneers cannot reach far enough to the lingual, so the space is blocked from view but becomes a plaque trap on the lingual.
Myth 5 – Direct bonding is too difficult
False. This may have been true in the past, but not in the modern resin era. Today we utilise anatomic Bioclear matrices coupled with injection moulding filling technique and, for example, a universal nano-composite. This creates an ideal interaction between the flowable and paste.
Best Practice Techniques
“Before the invention of the Bioclear Matrix, and prior to a disciplined approach to composite treatment of black triangles, many treatments compromised periodontal health. Multiple cases debonded soon after placement, while others suffered problems with staining. Bioclear Matrix offers a better solution.” Dr David Clark DDS
The interdental papilla serves as both a functional and aesthetic asset. Anatomically ideal interproximal composite shapes that are mirror smooth can serve as a predictable scaffold to regain this valuable gingival architecture.
Clean enamel surfaces can be leveraged to permanently retain the restorations.
But dentists must attempt this elective procedure using magnification, and with a strict adherence to dentin detoxification with a blasting appliance.
Let’s take a look at how the Bioclear Method works…
Use an anatomic matrix
Until recently, a flat piece of mylar has been the only matrix clinicians have had at their disposal. A new system of matrices, the Bioclear Matrix System, has patented both the shape of the matrices and the resultant papilla regeneration process that occurs with their use.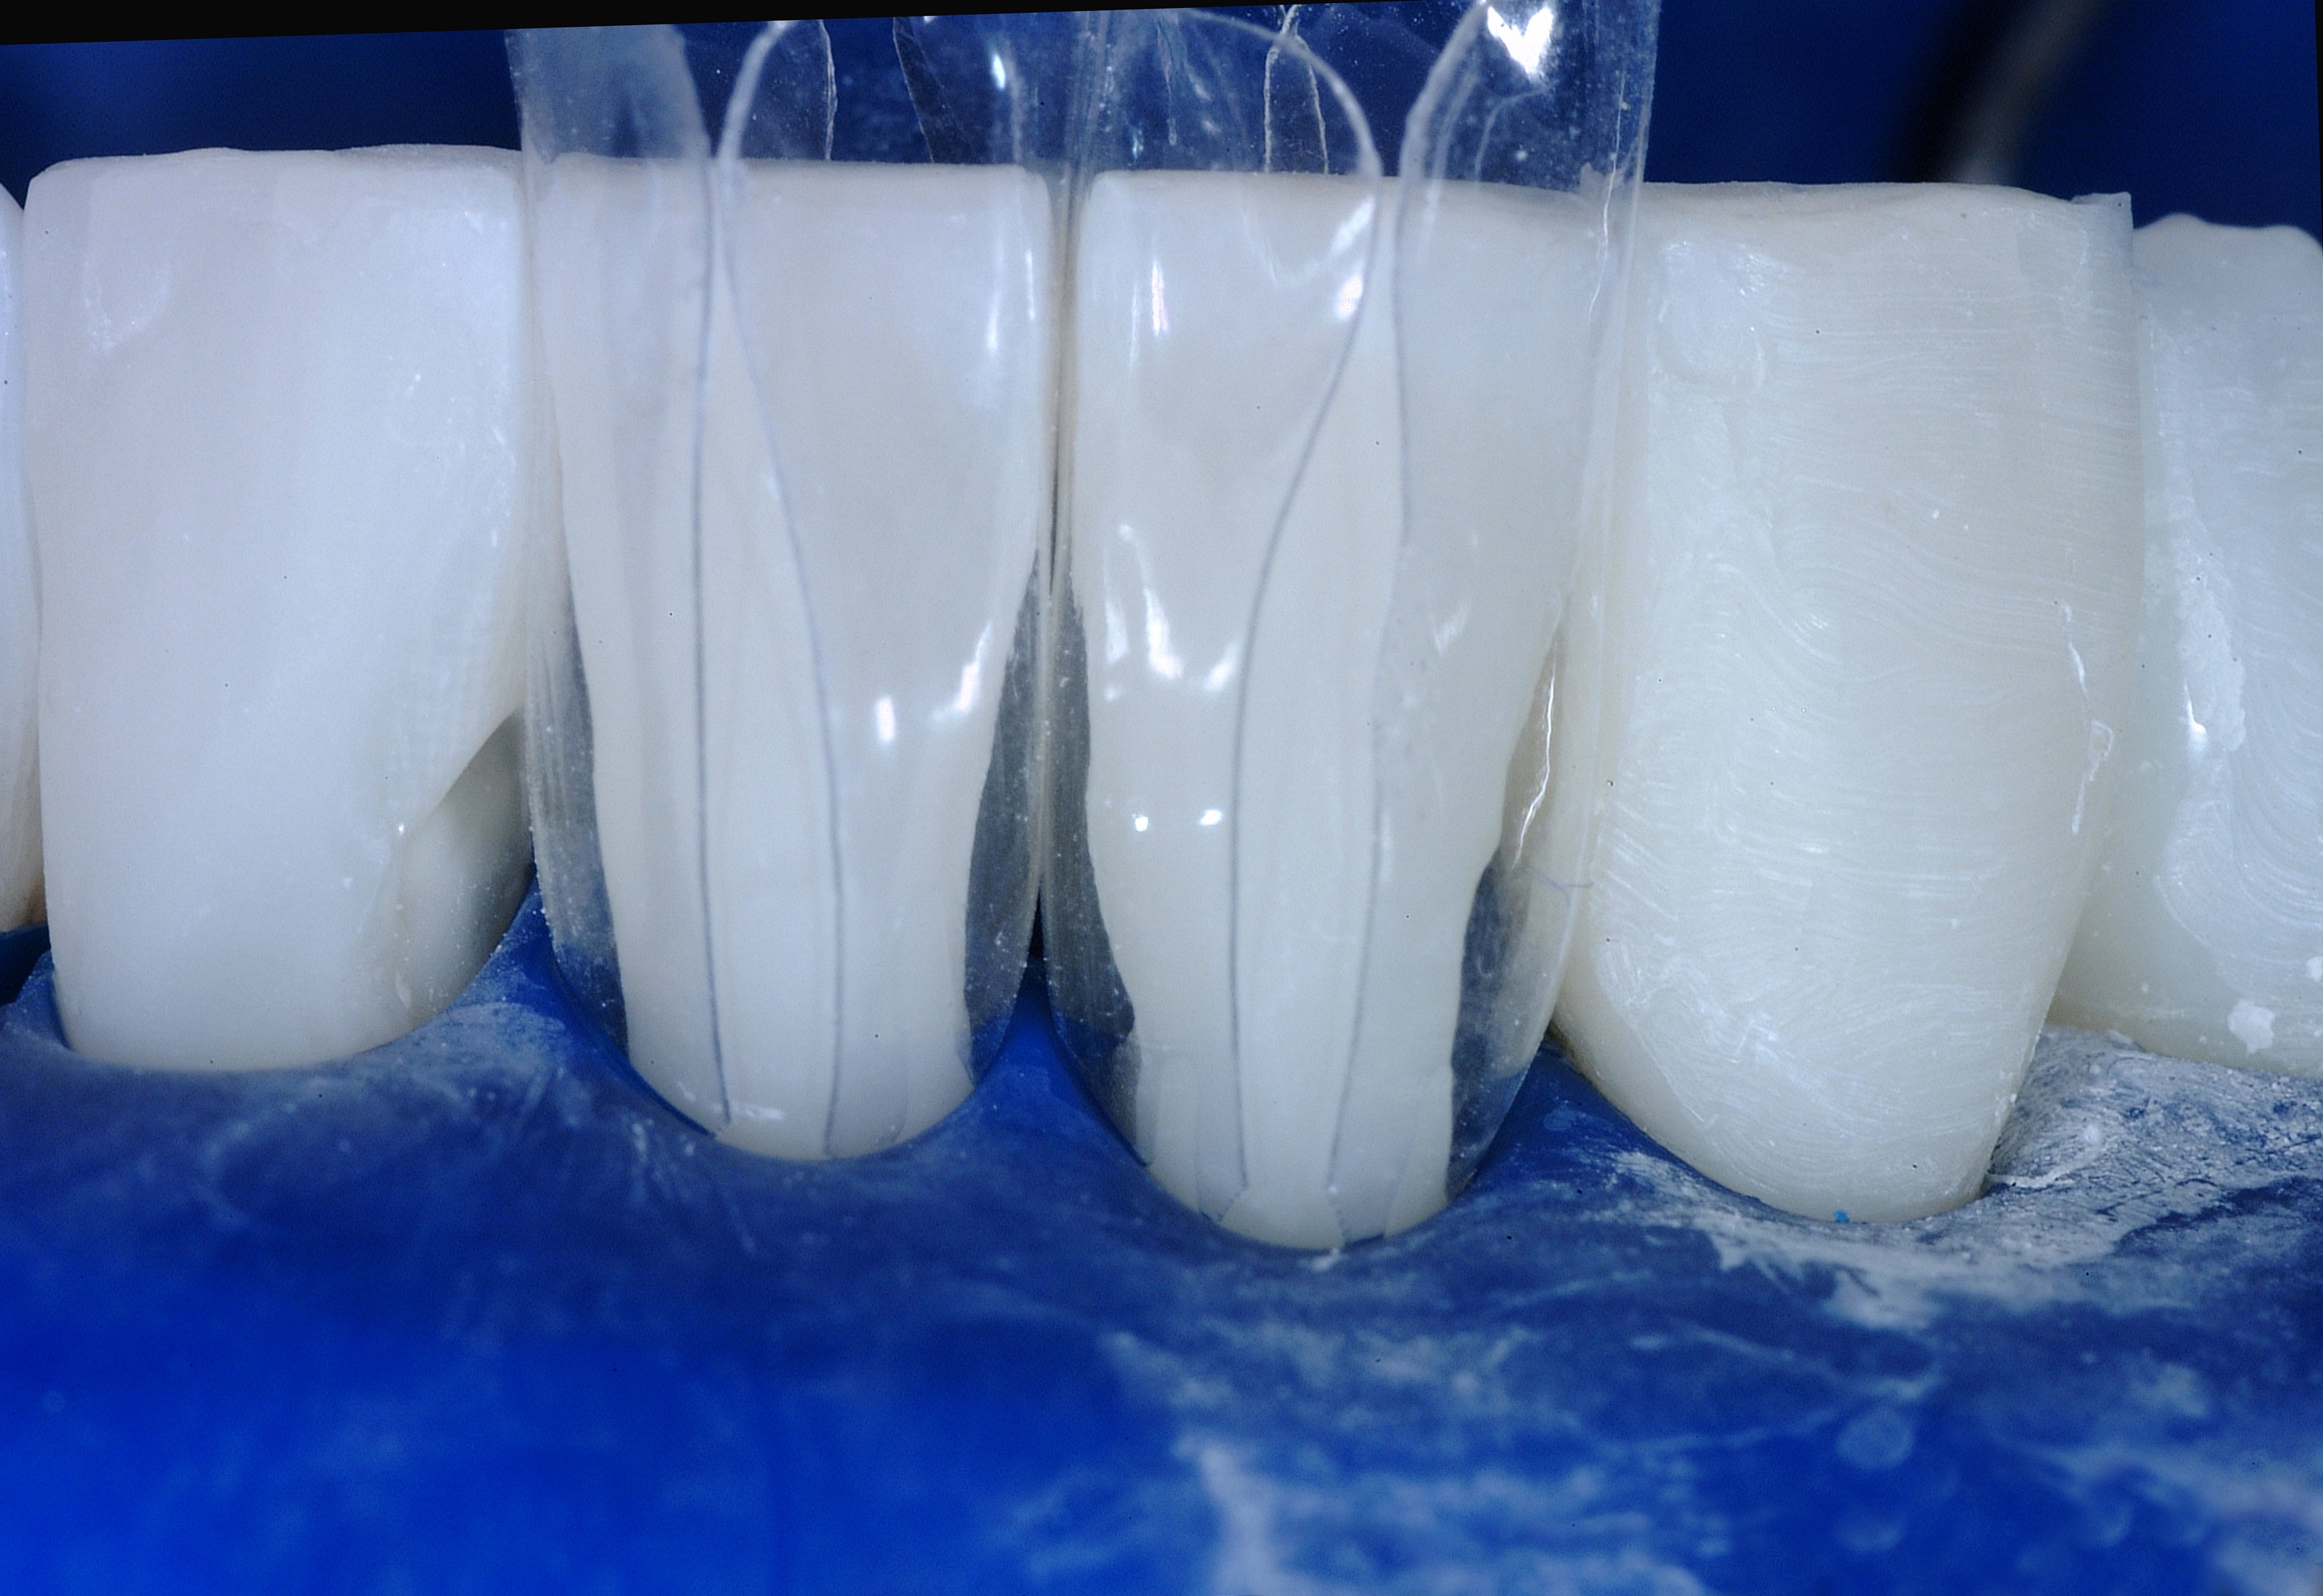
Implants, porcelain laminates, and crowns sometimes have aggressively curvaceous emergence profiles that are needed to close spaces along the gingival margin of these prostheses. When well planned, fitted and smooth, the tissue response can be both dramatic and healthy.
In this case, both the anterior (with 0.7 mm of cervical profile) and the diastema closure (with 1 mm of cervical profile) were mixed and matched for the variety of spaces that were present.
Use tips in smaller sizes
When injecting composite, using a smaller tip size enables dentists to get composite into the small toothmatrix interface. The first composite to be placed is an aesthetic flowable composite. This is injected with a size 20 gauge tip, and is considered the ‘wash’ component.
A ‘body’ paste composite is then injected directly into the ‘wash’ of flowable composite that was placed first but not light cured. This is similar to using light body and then heavy body impression material together.
Heat the composite to 68°C
Composite manufacturers do not have official statements regarding heating of composites, but multiple studies have shown that heating composite to a temperature of 68°C improves flow, reduces microleakage, and aids polymerisation.
While many dentists have traditionally shied away from this heating, today we are learning that when integrating injection moulding into procedures like the black triangle, heated composite has overwhelming benefits.
Heating of paste composite creates more microscopic vibration or movement of the molecules, allowing for improved flowability. This temporary liquefaction of paste composite is a welcome advancement in the placement of resin restorations.
For the paste restorative, Dr Clark recommends heating to 68°C to improve flowability.
This technique can even be used with the flowable formula. The advantage of using composite with heat is that the material can be used in both the posterior and anterior.
Change your mindset
Old school mindsets in dentistry refer to paste composites as ‘packable’. The modern approach is a hydraulic driven model that uses injection moulding and different viscosities of composites, allowing the composite to do the work.
Create an infinity edge preparation
The traditional model of tooth preparation is to cut a box, which is supposed to have a clean margin at which composite will cleanly stop.
When you inject composite into such a preparation, it naturally flows over the sides. To manage this, traditional methods typically polish the composite back to the margin line.
However, the Bioclear technique involves ‘sanding’ the whole tooth to allow the composite to flow all around it. This is referred to as an infinity edge margin; it becomes increasingly thinner until it disappears, and provides both strength and aesthetics.
“Dentists should stop using the word margin and think in terms of a tooth-restoration interface, or TRI.” Dr David Clark DDS
This TRI is an area from 0.5 to 2 mm of lightly abraded and then etched enamel, which embraces composite’s tendency to flow past the old-fashioned notion of a clean margin.
Mix flowable and paste composite with injection moulding
Unfortunately, much of the focus for composite choice and use in black triangles has neither benefitted dentists or patients in terms of the procedure’s outcome. Often the focus has been on layering and translucency, and these issues can distract the dentist from the real problems and solutions available.
A better method involves using flowable composite and paste composite, mixed with injection moulding, in a modified snowplow technique.
The injection moulding process has vastly simplified shade selection.
These composites come in three different shade categories:
– Enamel: this is quite translucent. In general, Dr Clark recommends avoiding these shades unless restoring the incisal edge of a tooth.
– Dentin: these shades are typically too opaque for this purpose.
– Body: this is Dr Clarks’ recommended composite.
There are many factors to consider in the treatment of black triangles, but by combining these composites with the infinity edge margin design, shade matching and translucency are not concerns.
For treatment of the gingival half of the tooth, Dr Clark almost exclusively uses body shade composites. 3M ESPE has elected to use the body shade to match their flowable composites.
There is also an excellent and invisible interface between the colour and opacity of Filtek Supreme Ultra Flowable Restorative, and Filtek Supreme Ultra Universal Restorative.
This simplification in shade matching is extremely welcome in the treatment of black triangles.
The choice of composites is important because dentists need to have confidence in the final restoration’s invisibility, as well as the matching shades of the flowable and paste composites.
Due to high filler content and robust characteristics of these restoratives, the small percentage of flowable composite, combined with the paste composite in this technique, has resulted in very robust and aesthetically pleasing restorations.
Dr Clark has treated hundreds of black triangle cases this way, and this method has been taught to thousands of dentists to date, with remarkable success.
.png)
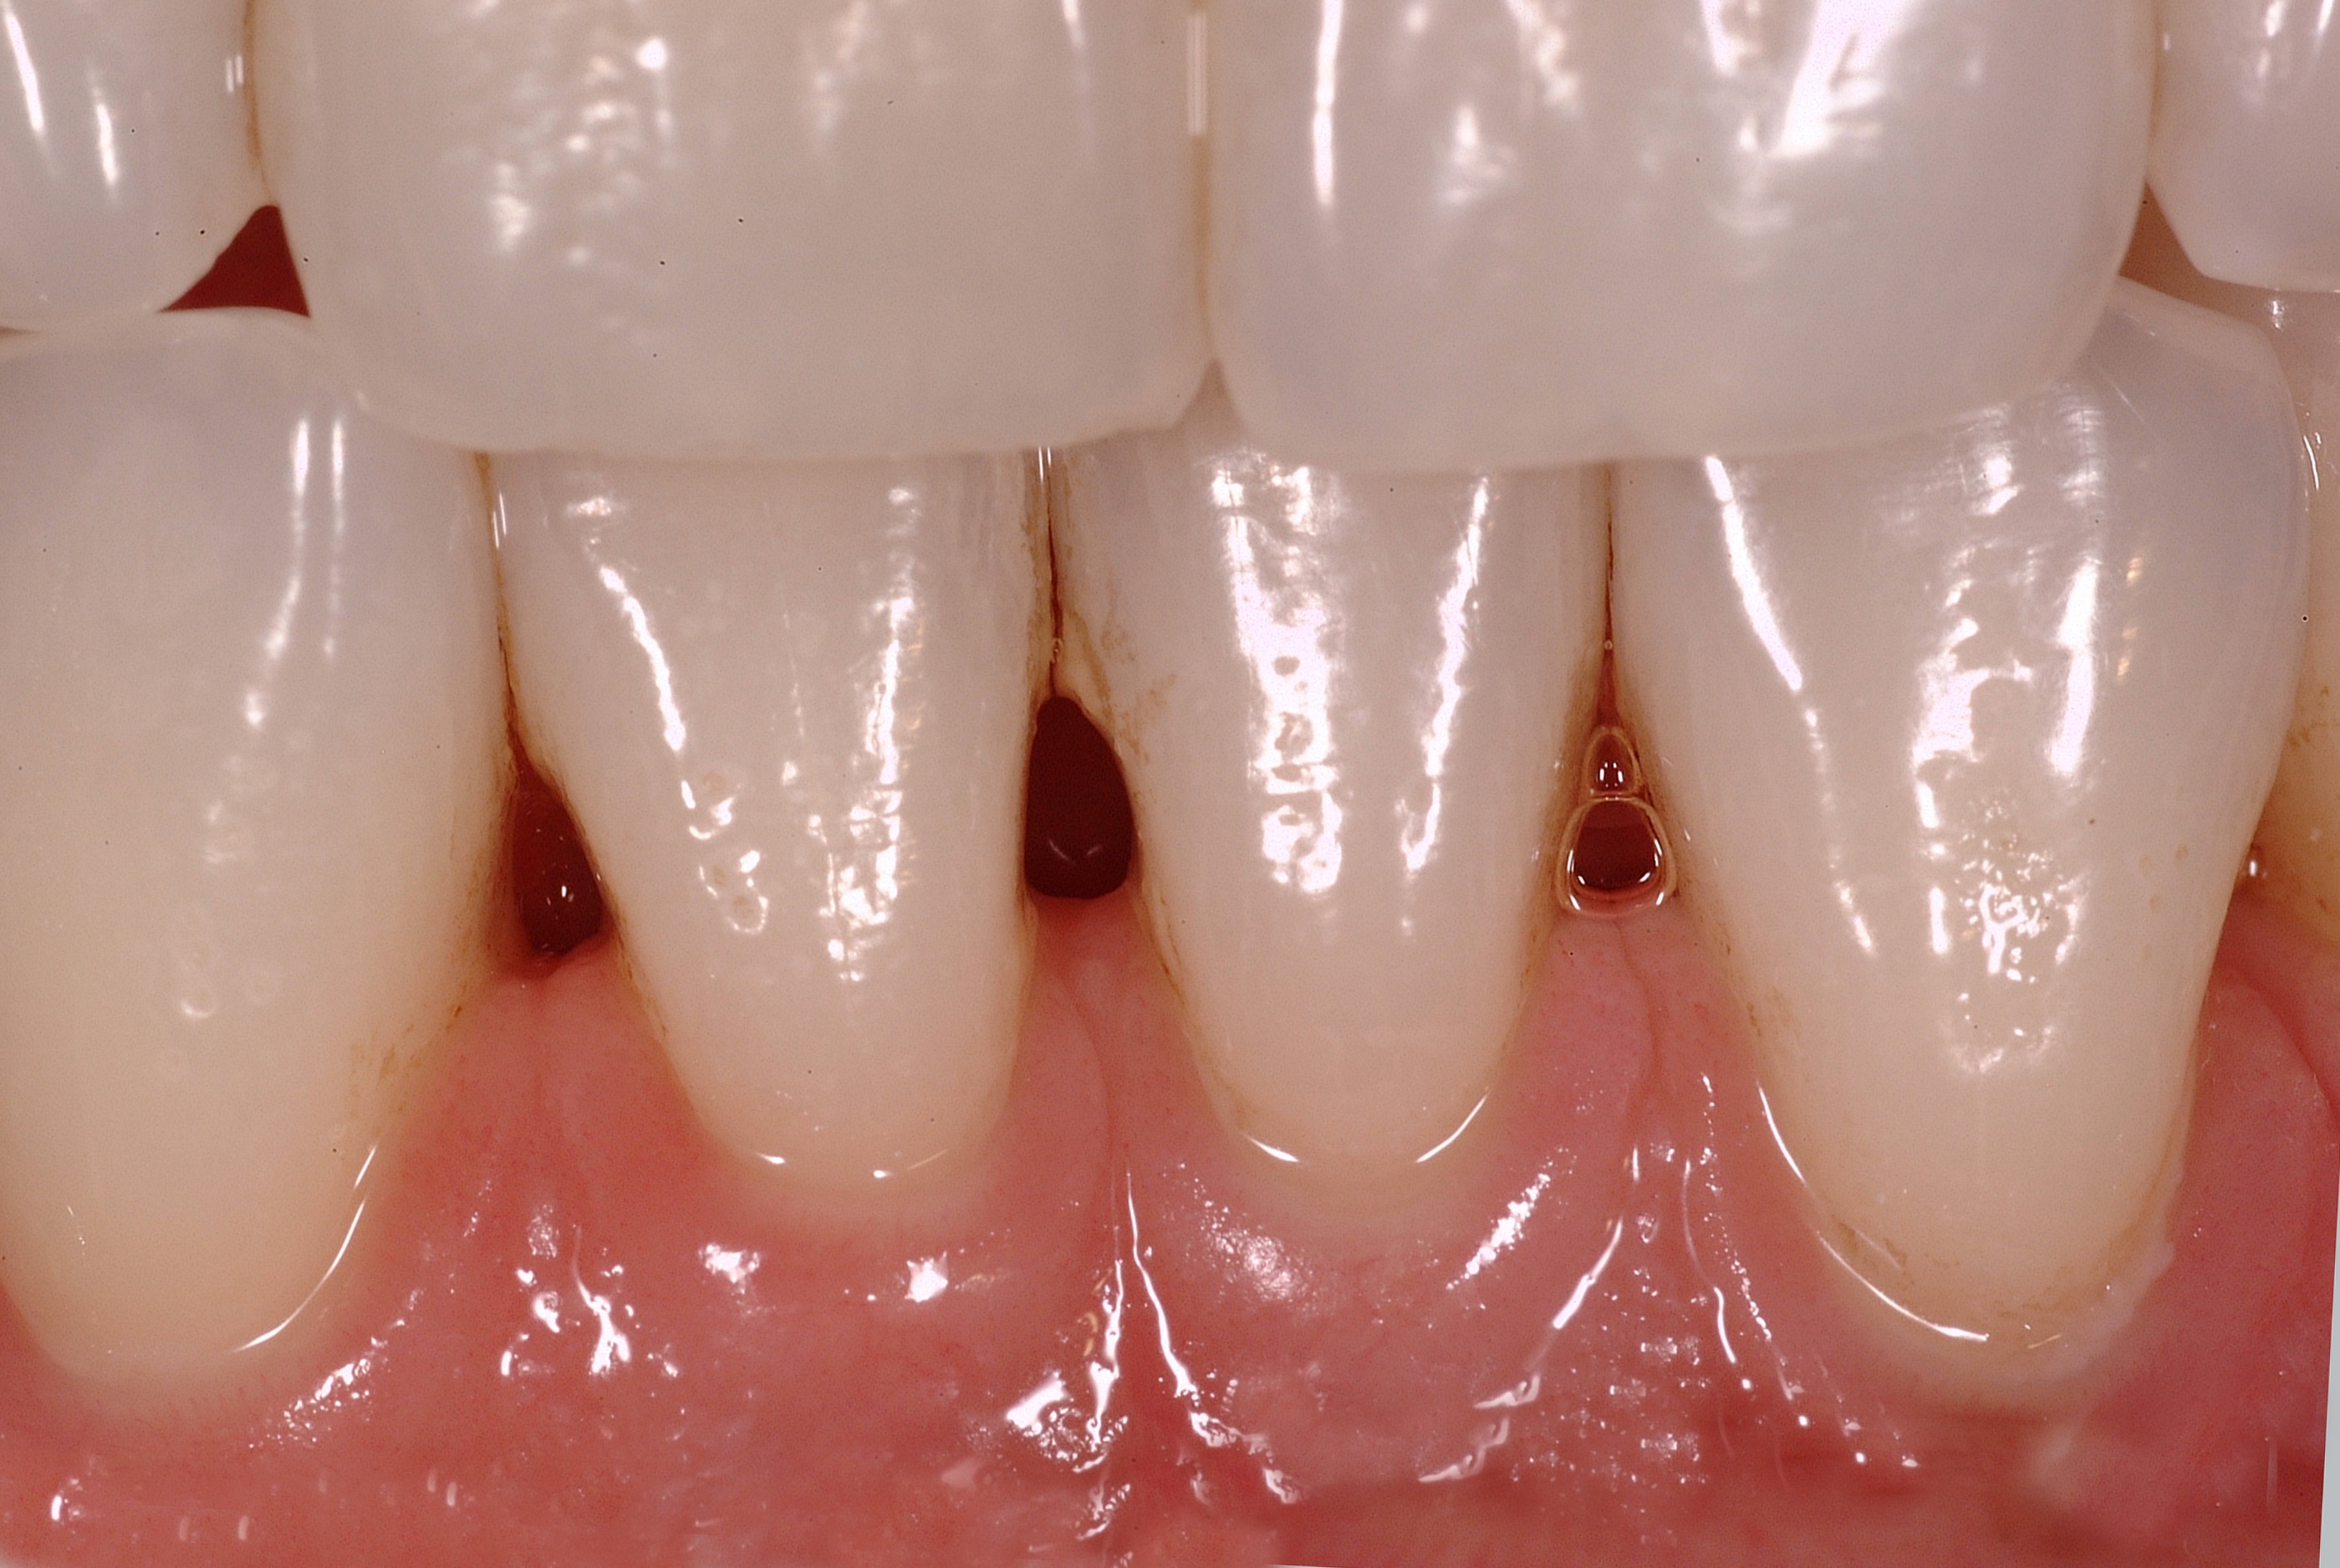
Clinical Case Study
A young professional read about Dr Clark’s technique and has flown across to the US for treatment. The patient believed her smile was marred by black triangles.
The Rubber Dam
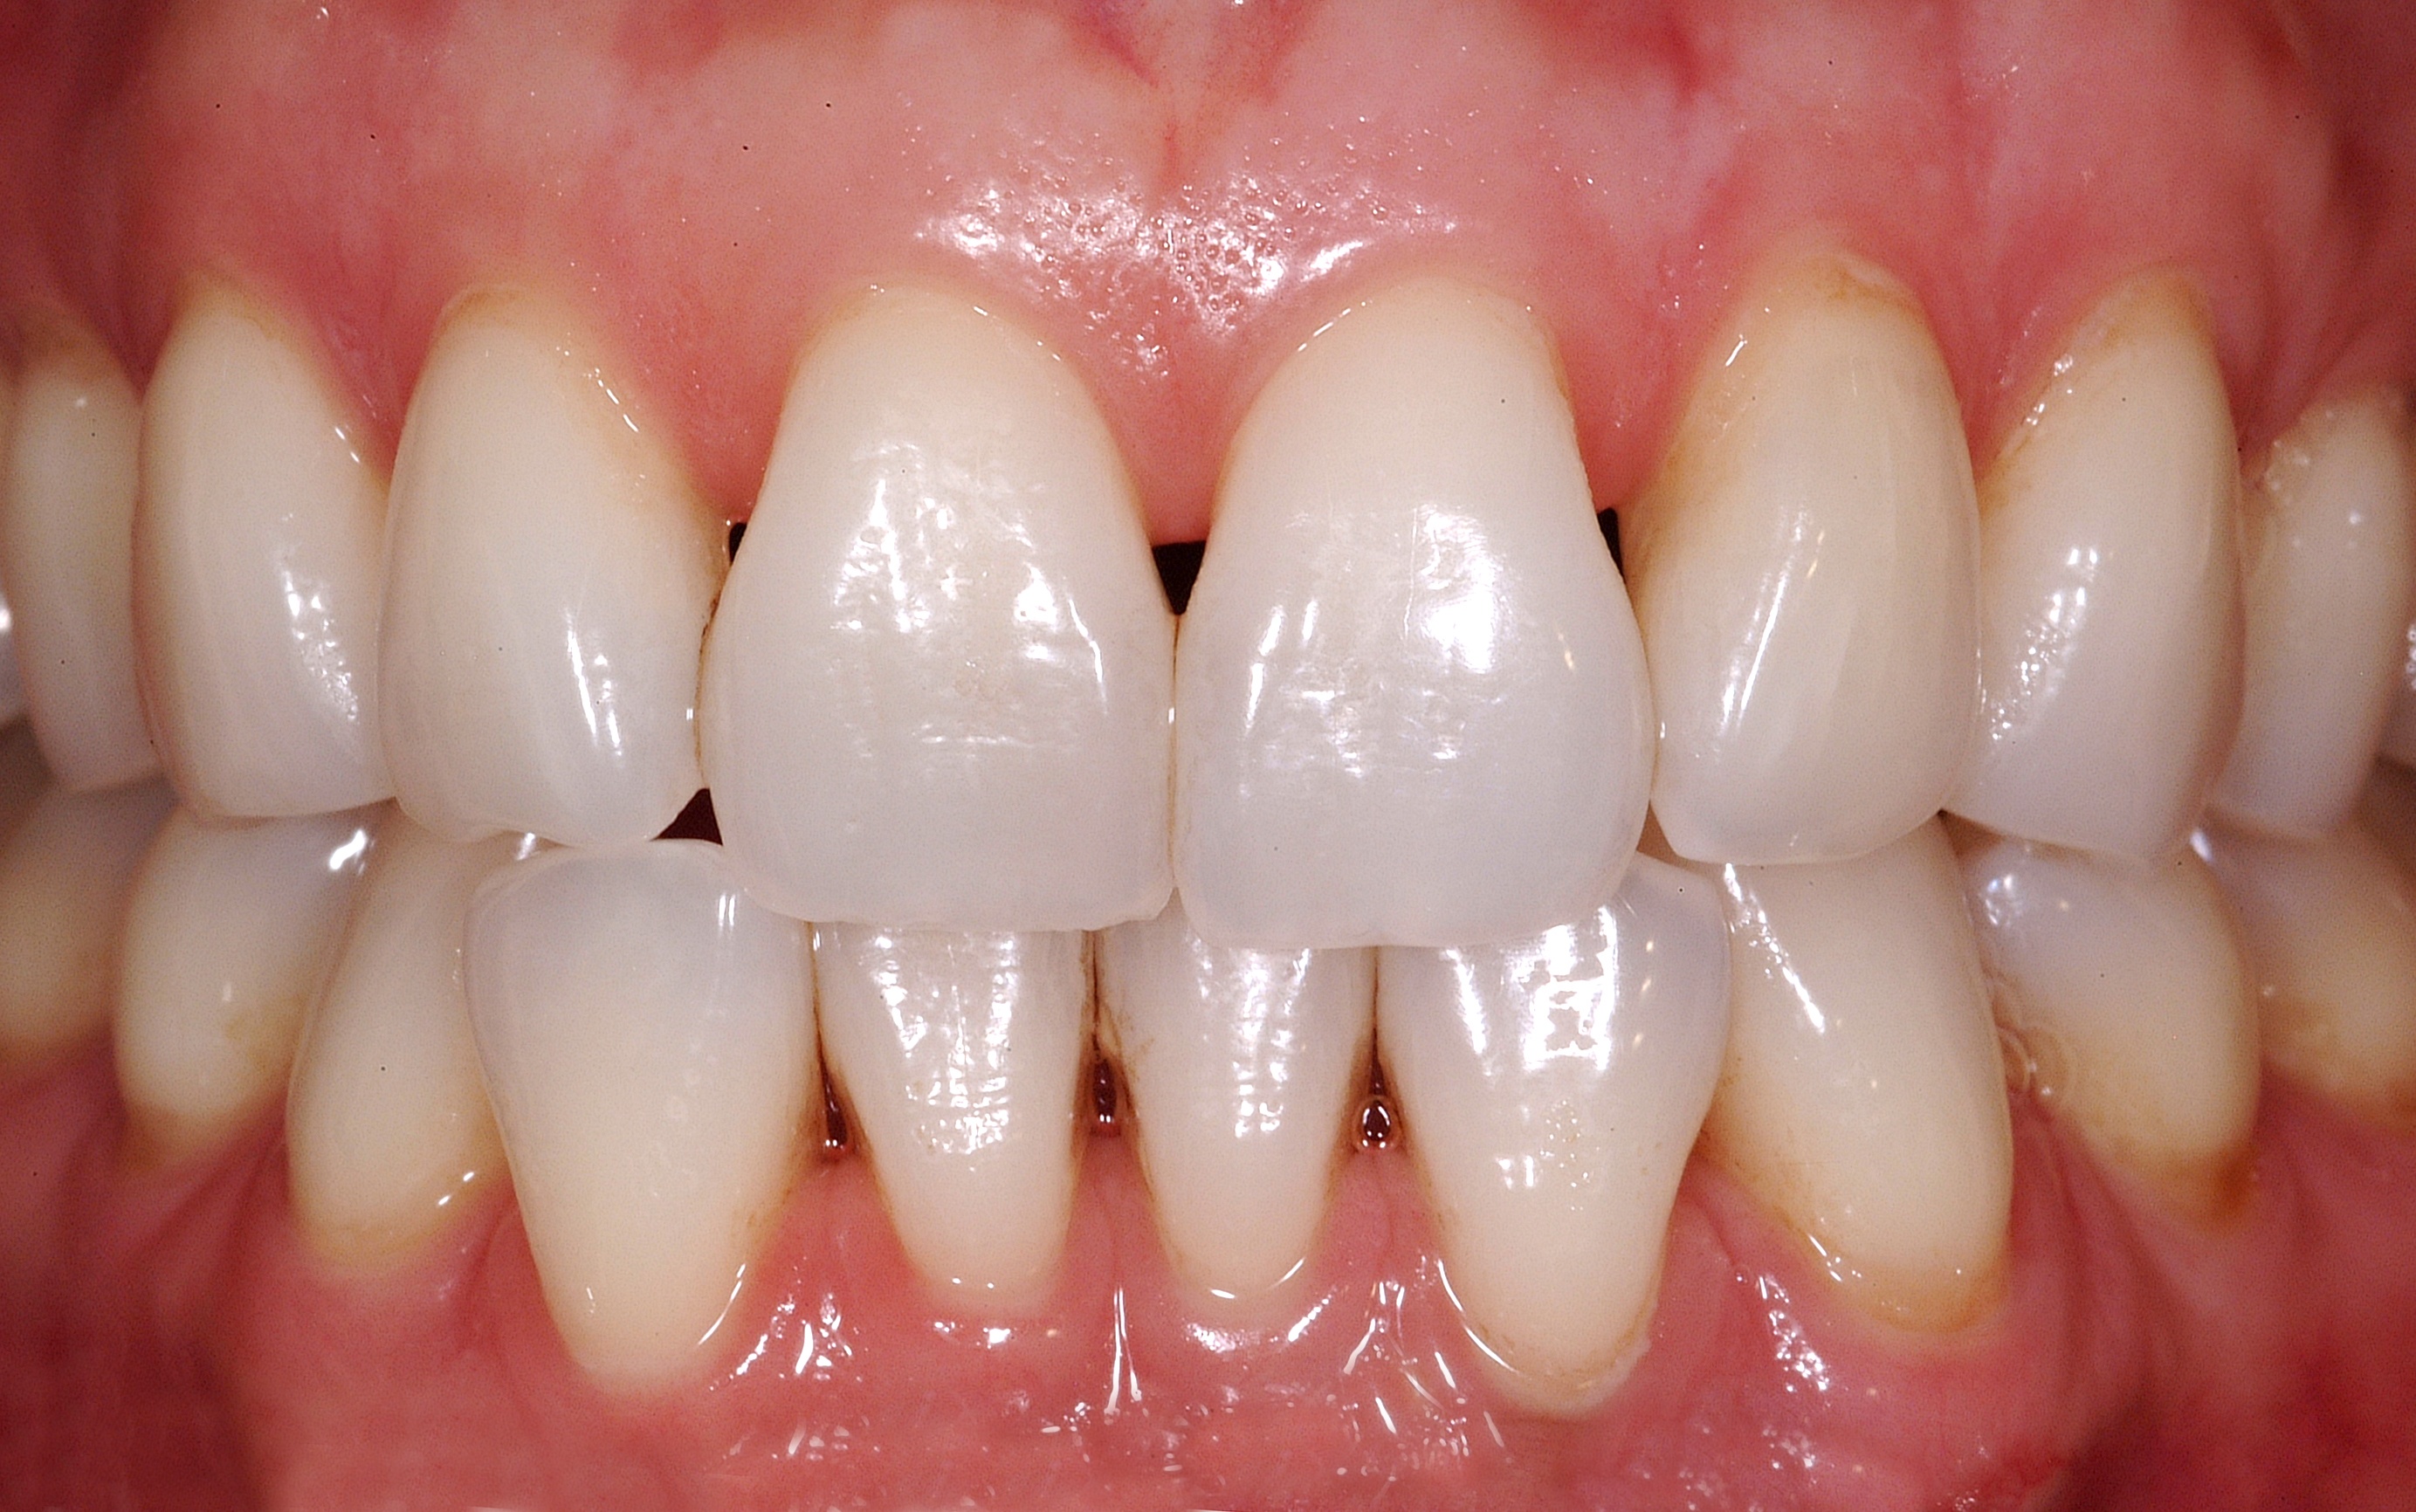 A heavy latex rubber dam was placed prior to beginning the treatment and serves a compressive purpose during the treatment.
 The use of a heavy rubber dam is important to manage soft tissue.
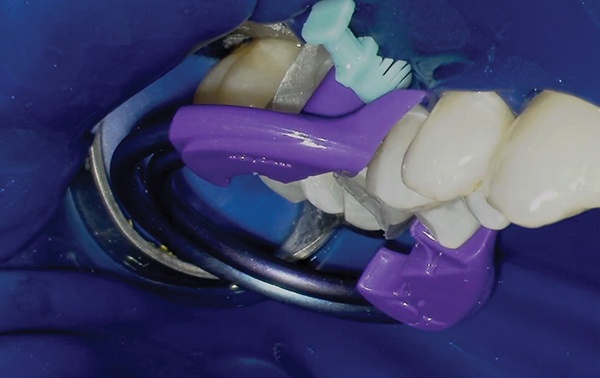
Diastema Closure Matrices
The diastema closure matrices are available in multiple sizes; the smaller matrix was used for the distal of the lateral incisor. Generally, one space at a time is closed on the upper arch. This would entail, for example, a matrix on the distal of No. 8 and the mesial of No. 9.
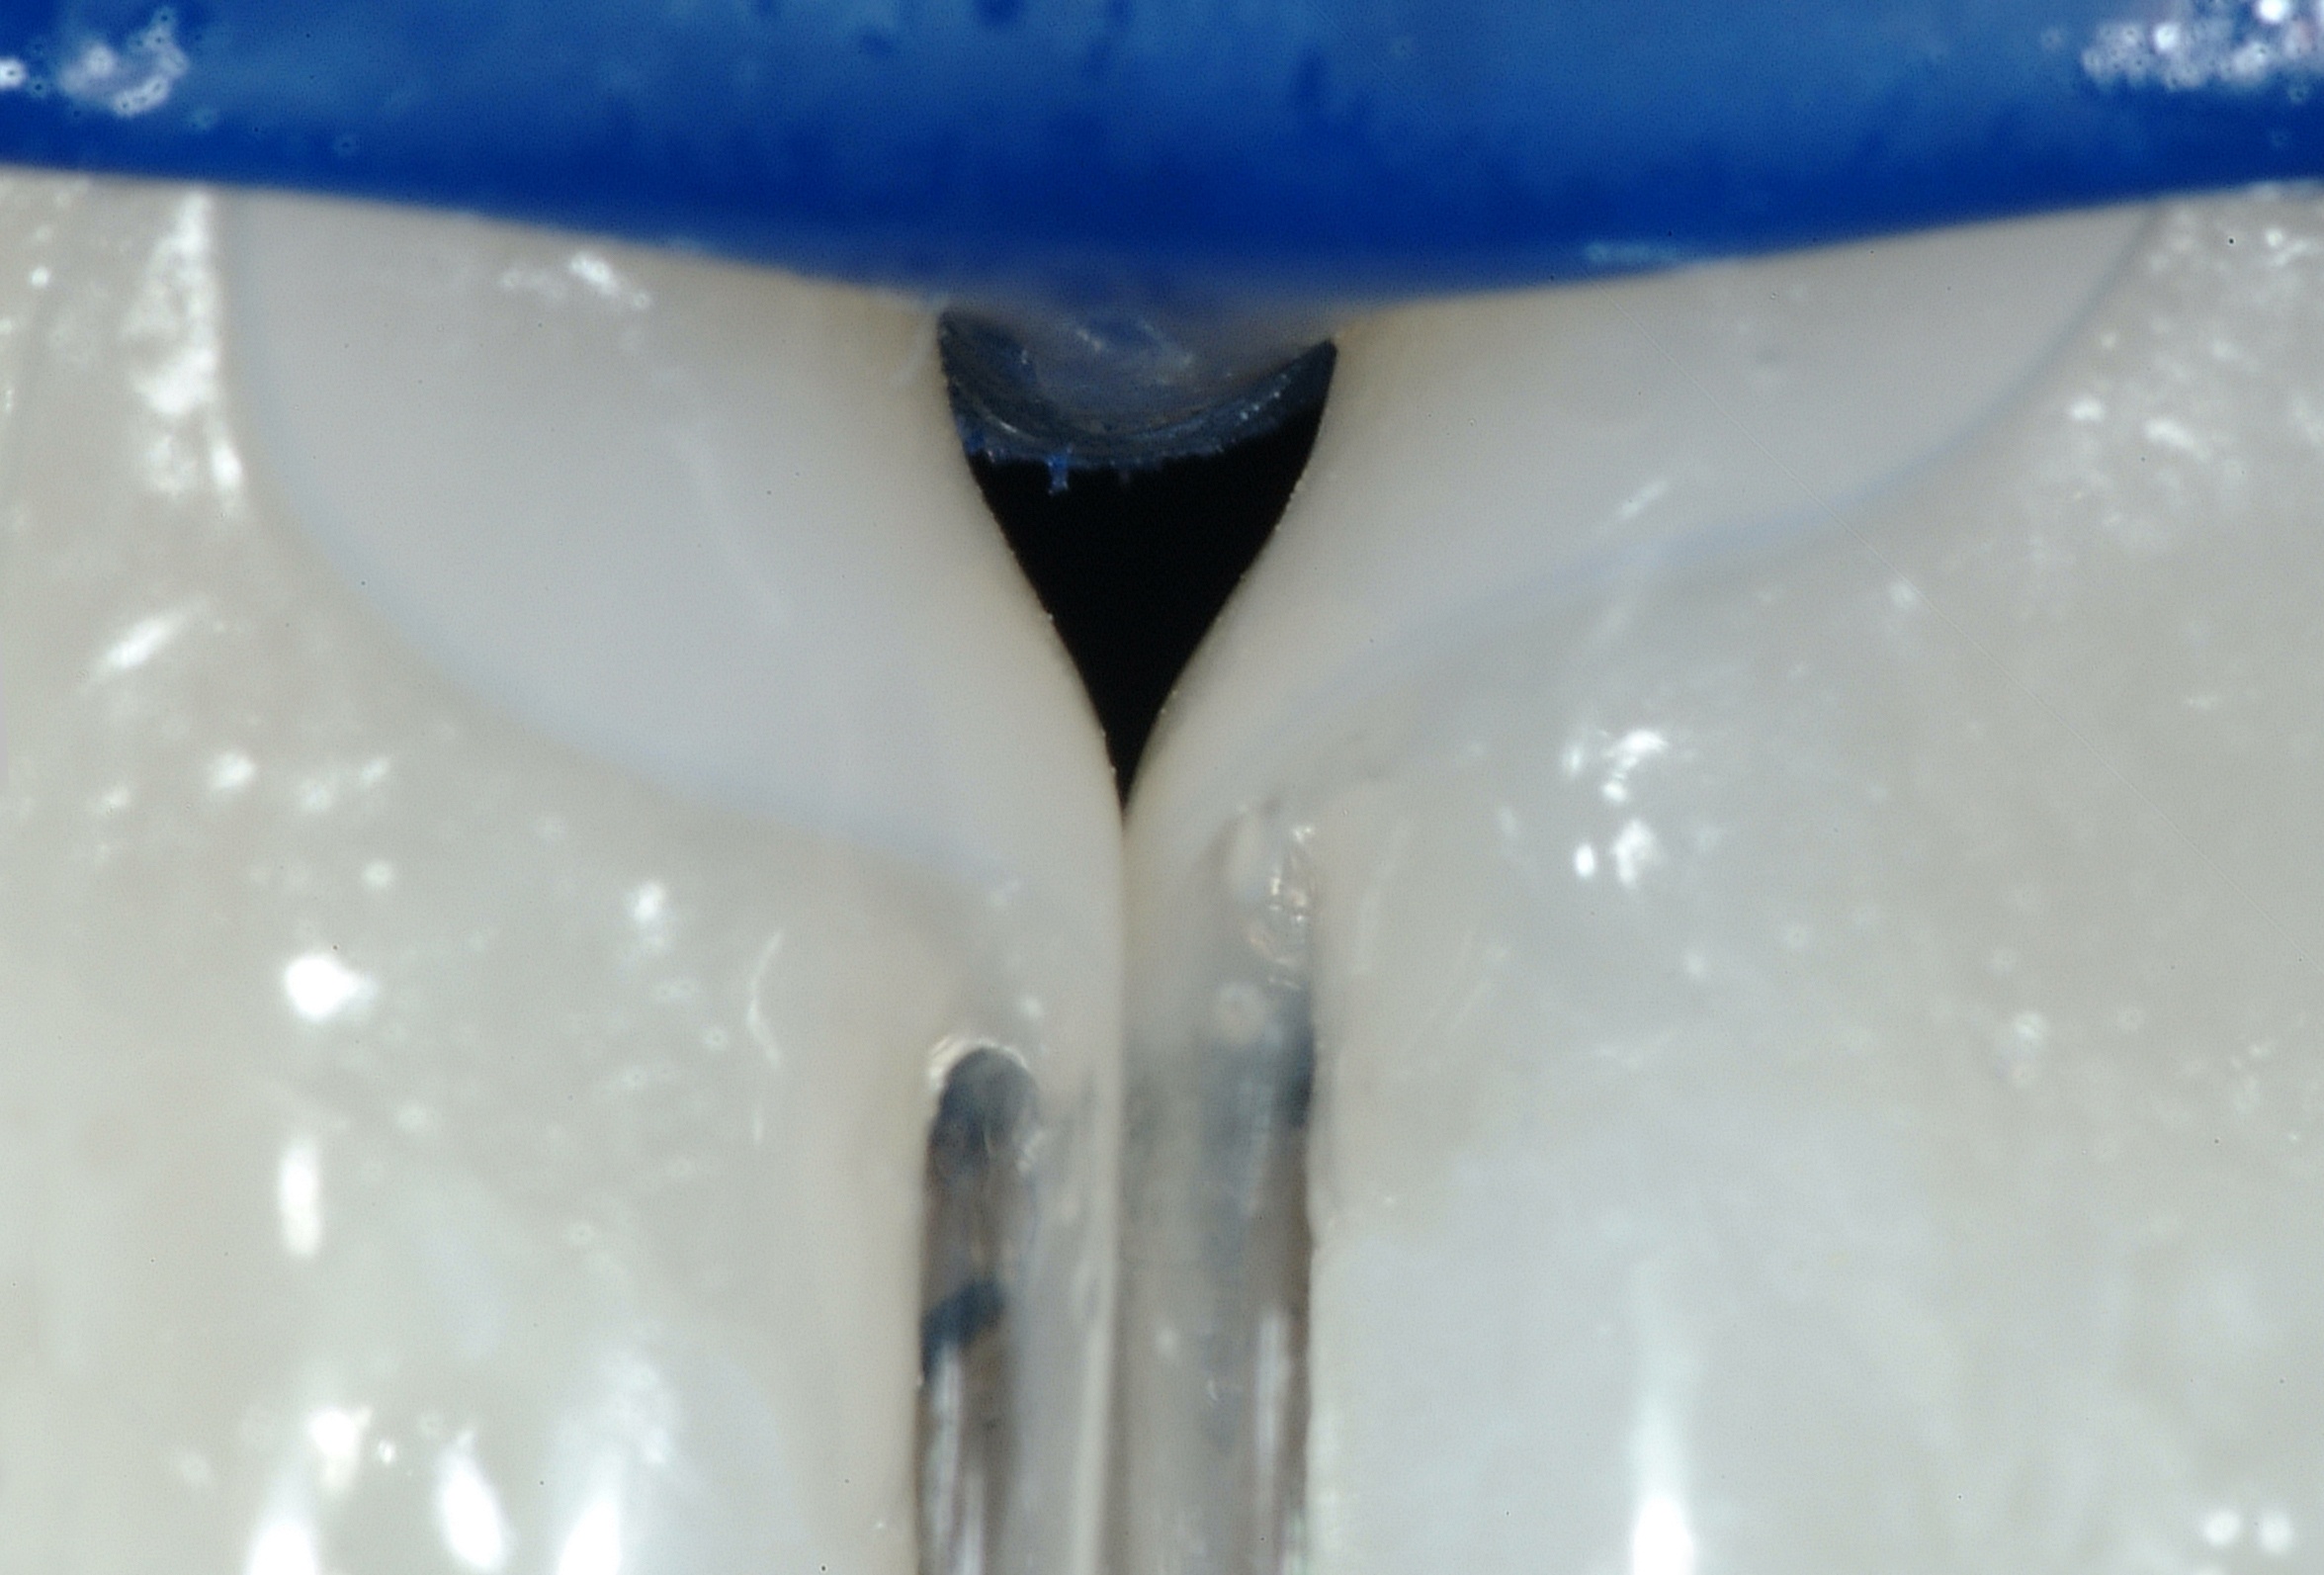
 The heart of the process is the shape and smoothness of the matrix, coupled with the ease of injecting ideal composites. The matrix is partially teased open with the tips of the syringes of both flowable and paste composites, and then the matrix springs closed upon removal of the composite syringes.
Another key to success in the restorative option of treating black triangles is the diversity of shapes and sizes of the Bioclear Matrix. Lower incisor teeth are small. The minuscule lower incisor matrices are crucial when treating the lower arch.
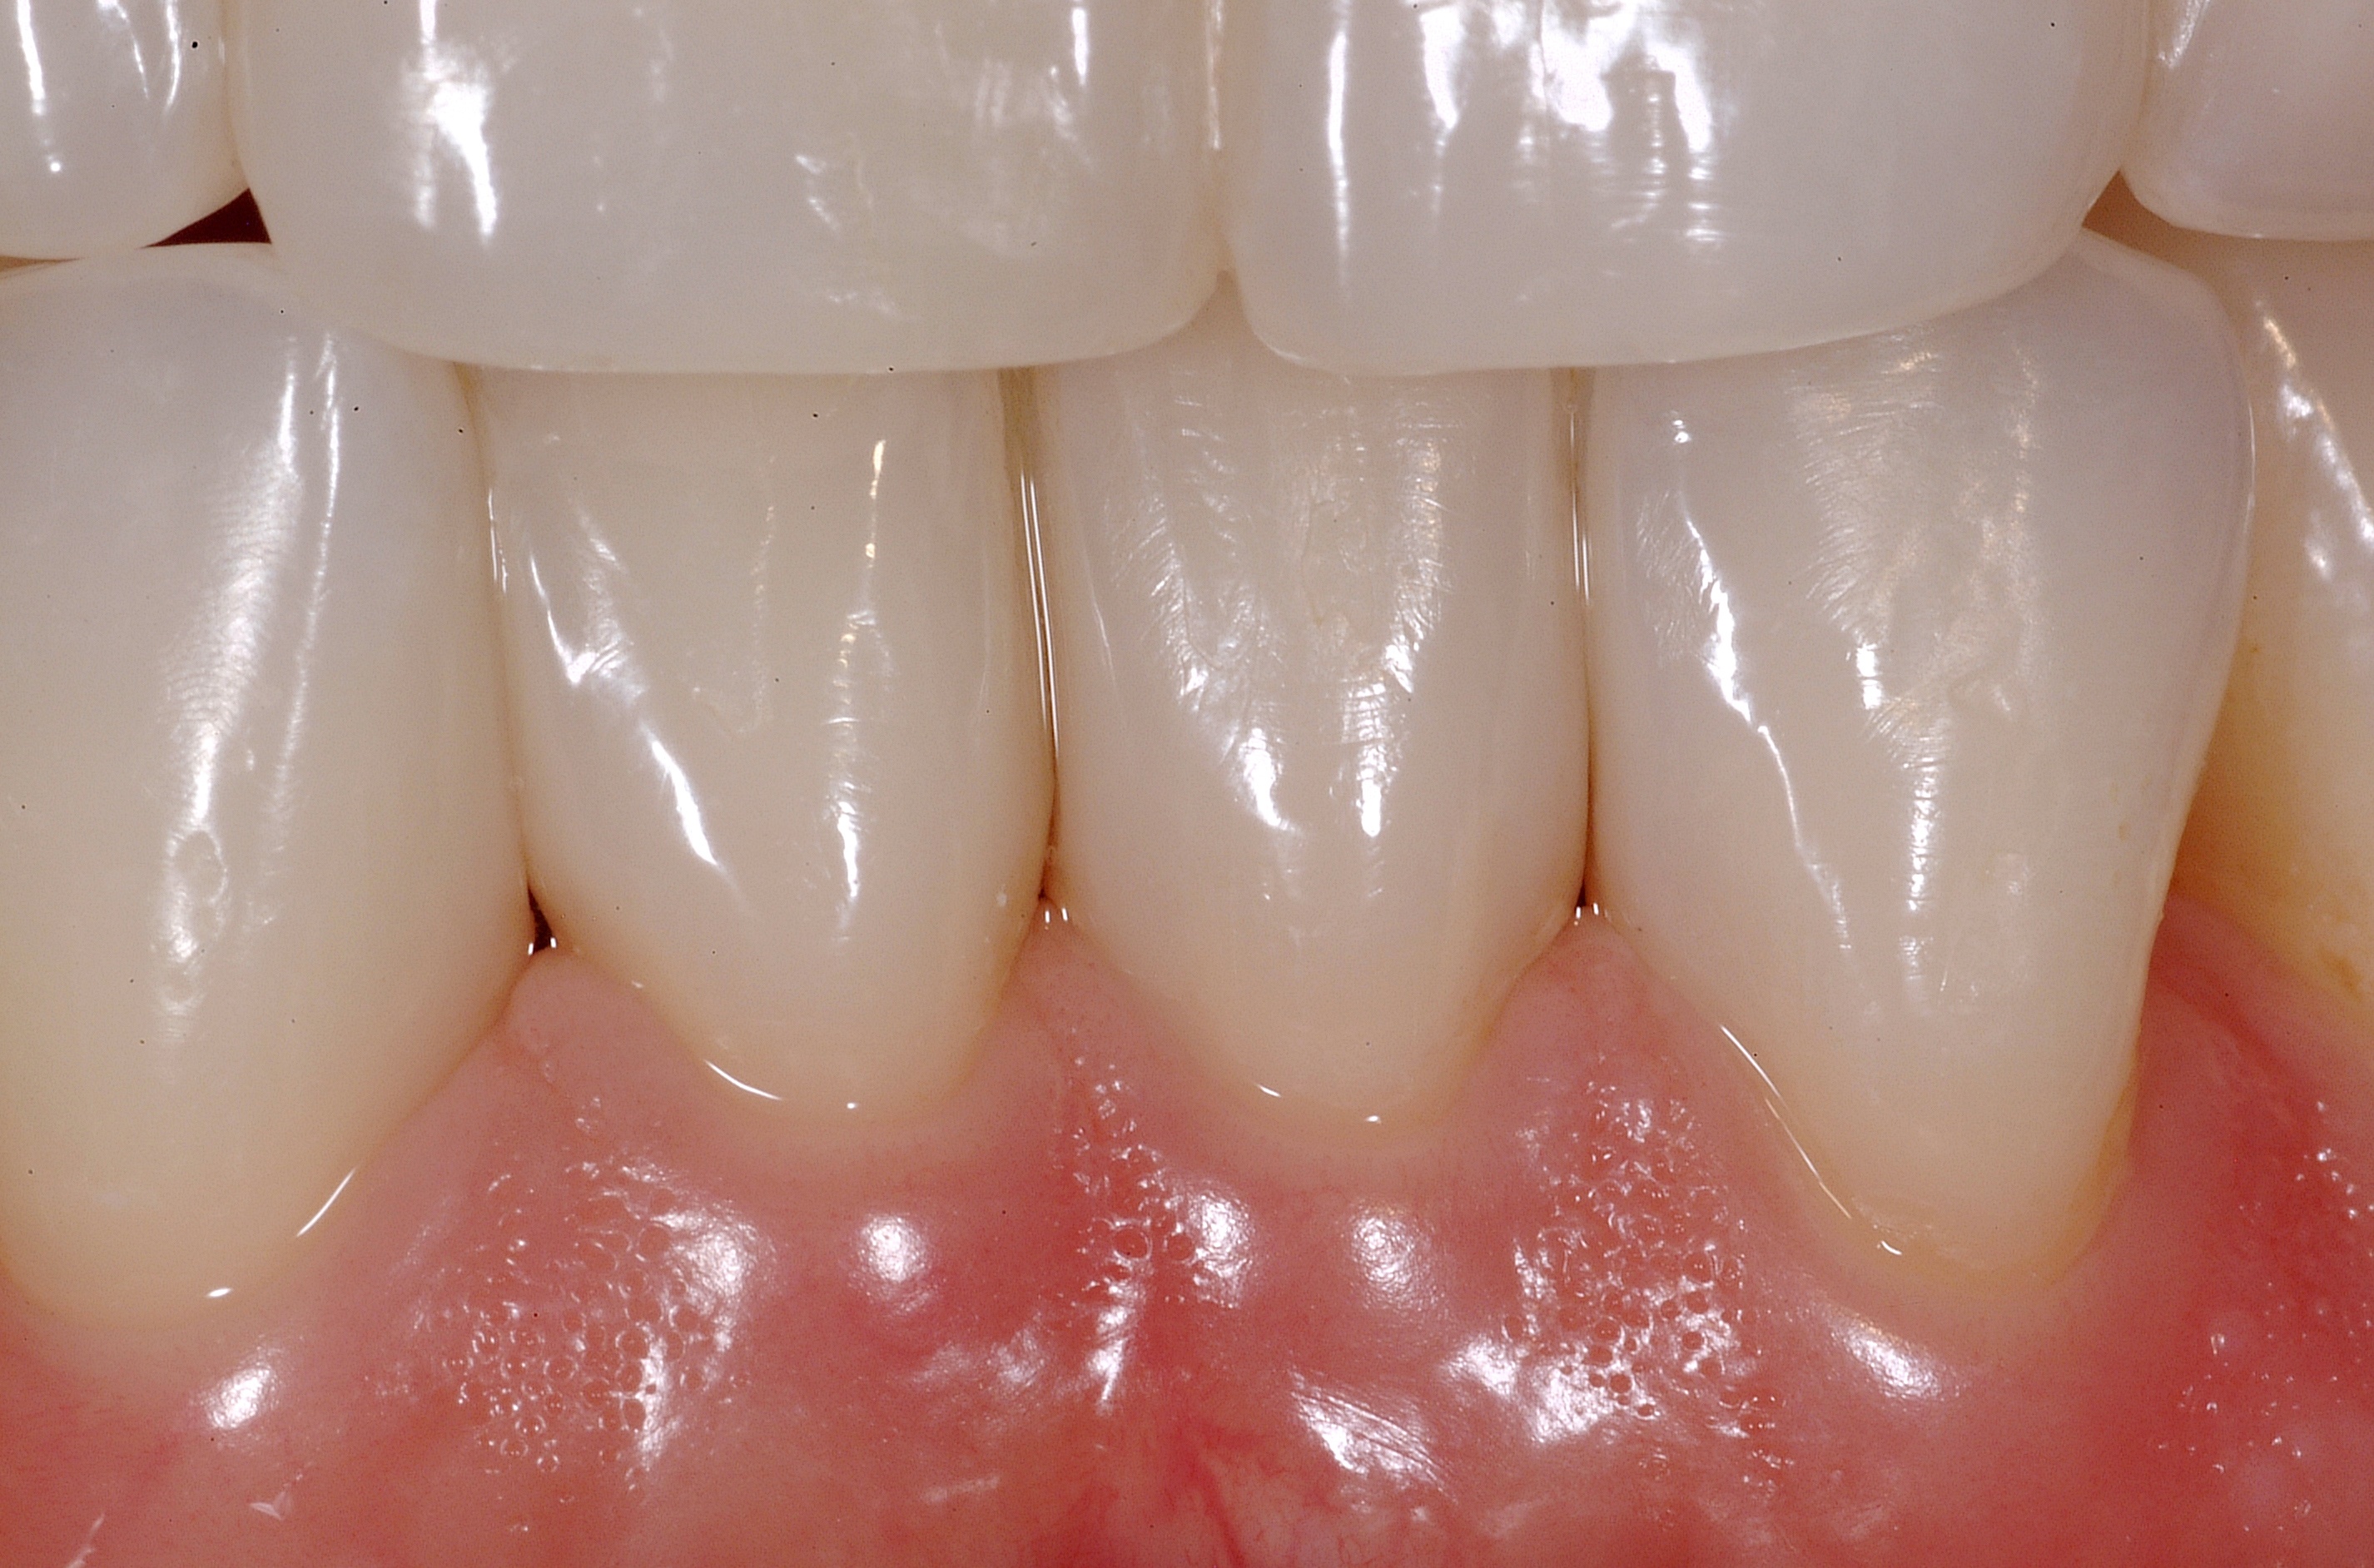
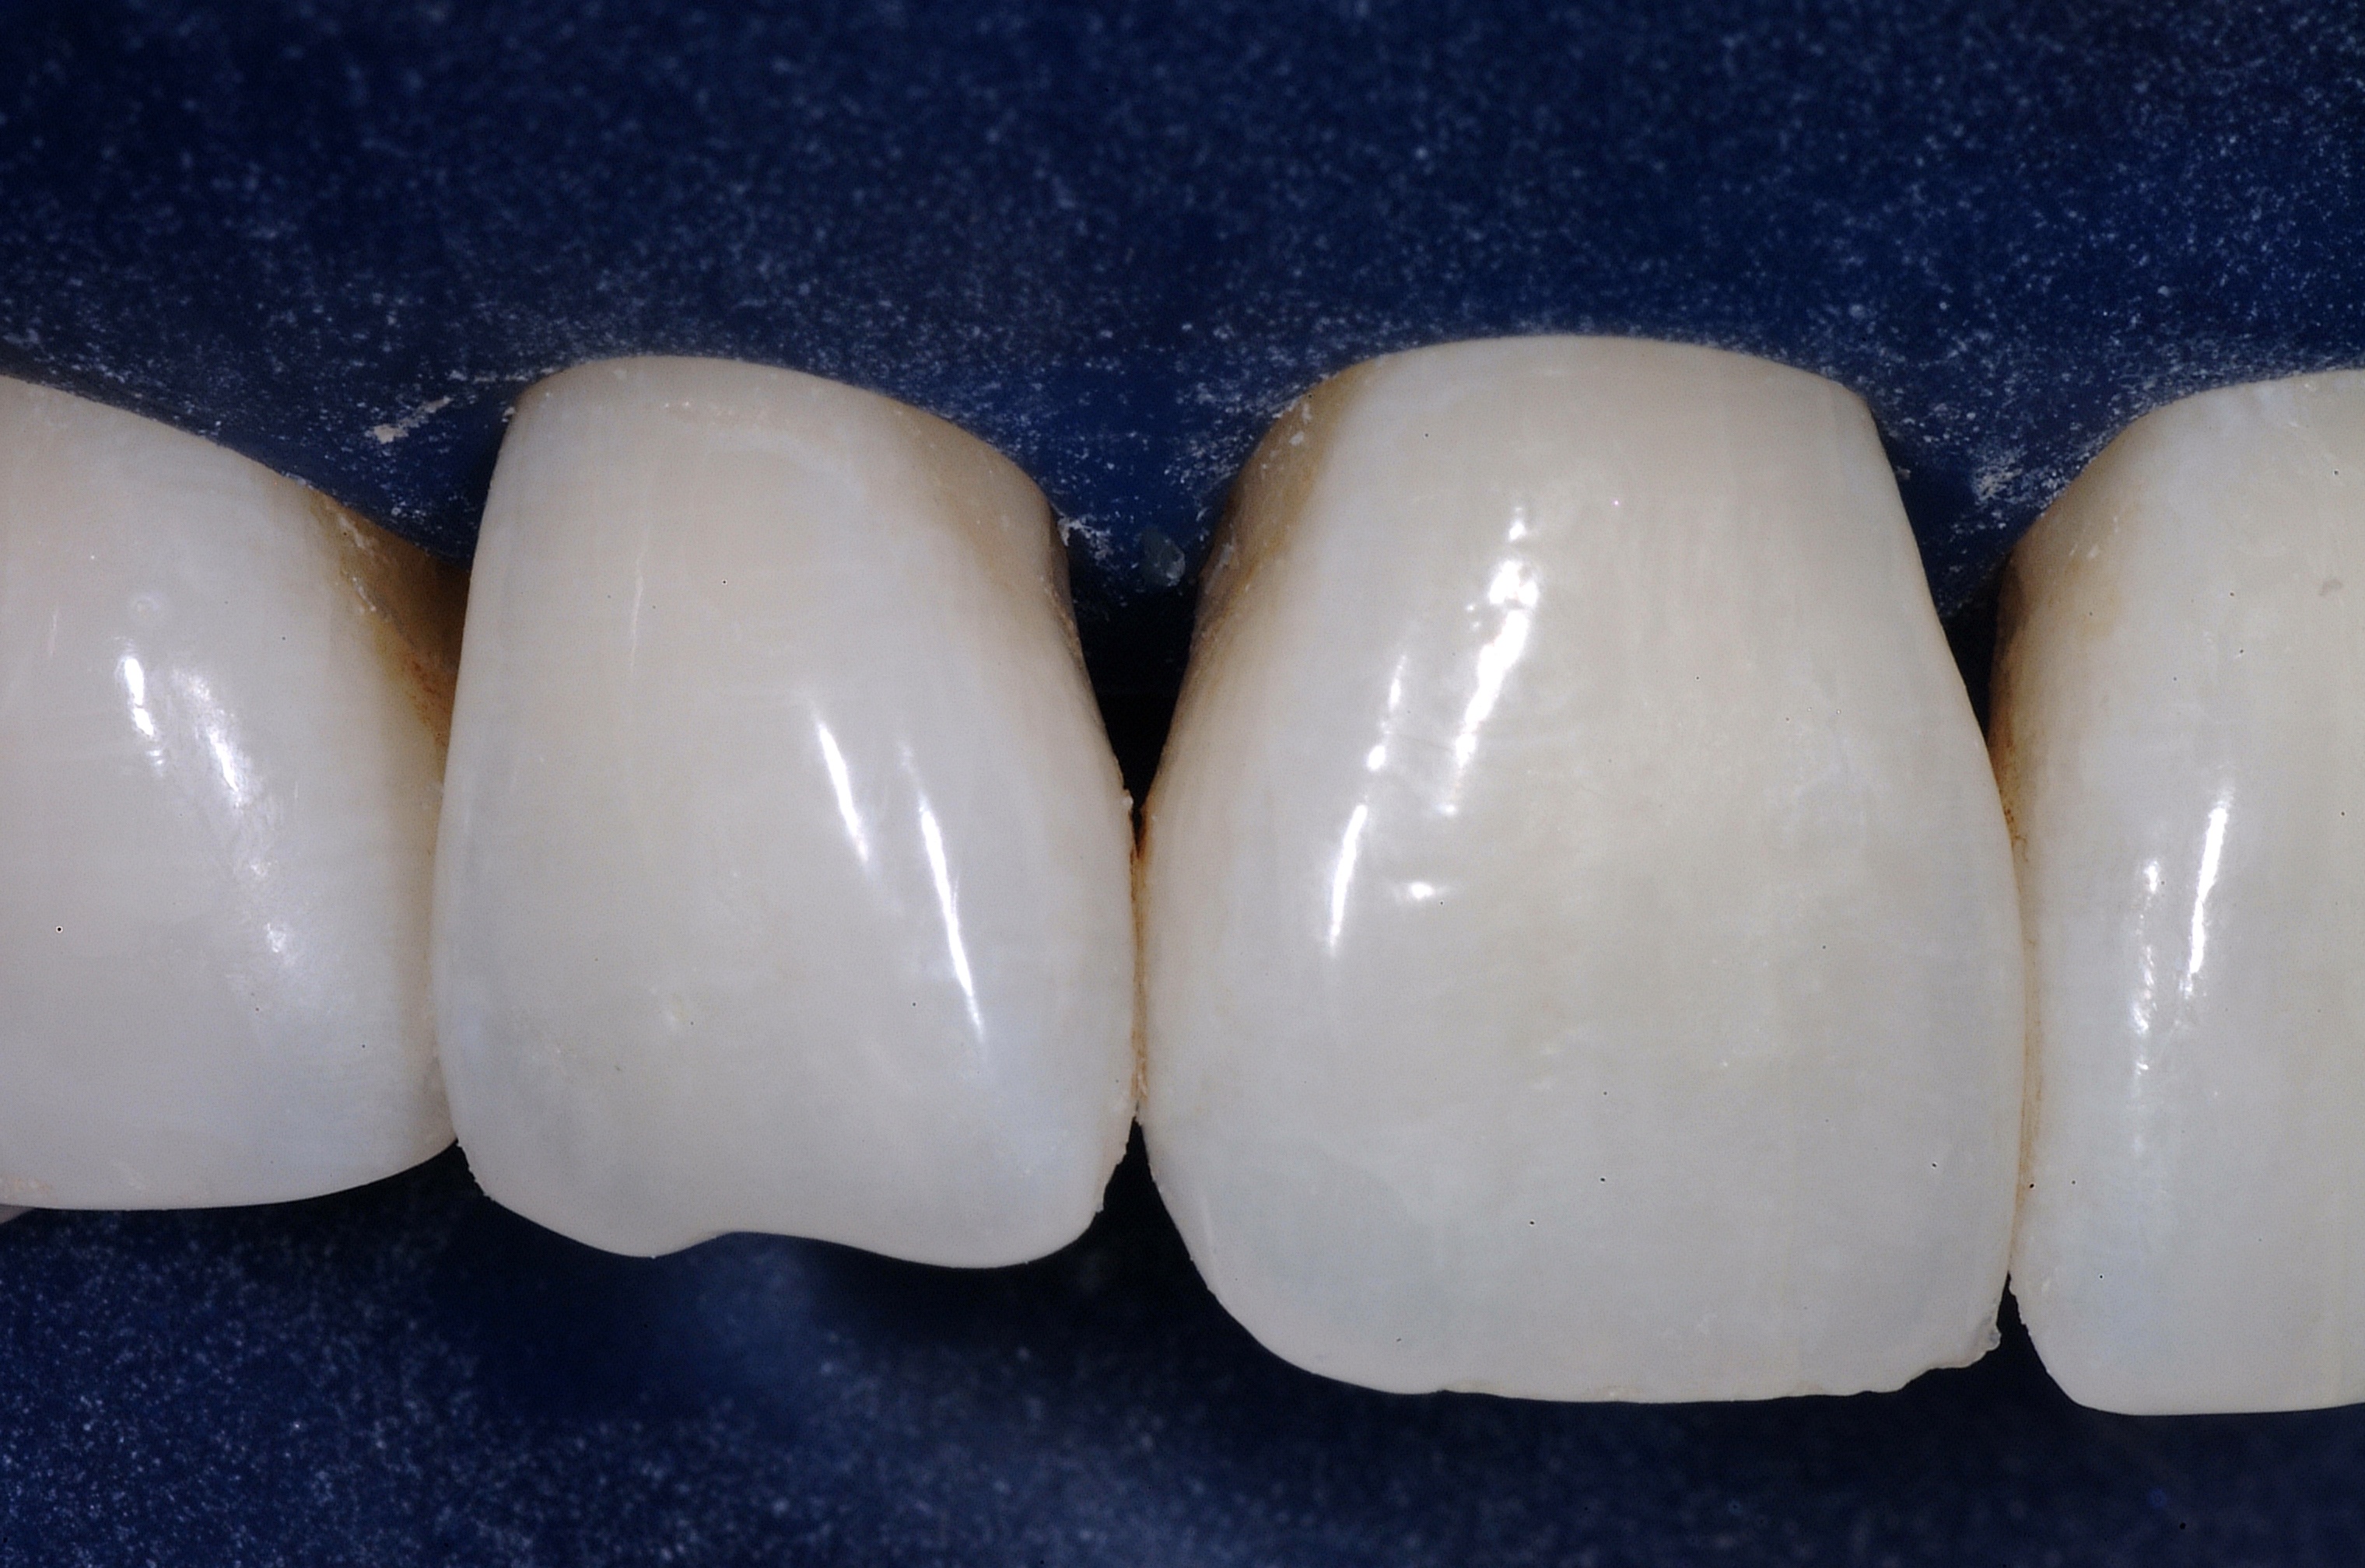
The Results
The immediate postoperative photo shows instant remodelling of the gingiva with static tension of the appropriately formed composite surface.
This immediate formation of a papilla assured both the dentist and patient that the case would be successful.
.jpg)

Video Case
This patient presented multiple open gingival embrasures – also known as black triangles. Her area dentist and periodontist recommended two treatment plans (16 porcelain veneers to close the spaces, or multiple perioplastic surgeries), both of which the patient rejected.
Instead, she visited Dr David Clark and agreed to the direct composite approach. Combining Bioclear’s Diastema Closure Matrices with the modern injection molding technique provides a predictable and minimally invasive option to treat black triangles…
Treating Black Triangles – The Bioclear Method from Optident Ltd.
After placing the rubber dam to compress and retract the gingiva, Dr Clark applied disclosing solution to aid infernal plaque removal.
Remember, phosphoric acid placed to etch the tooth will not remove plaque and is a leading cause of discoloration and microleakage of bonded restorations.
In this case, Dr Clark uses the Bioclear Blaster to strip away the biofilm and contaminated cementum. The matrices are then put in place…
As this patient showed no discrepancy in terms of tooth size, Dr Clark closed each black triangle using two matrices. These have between 0.5mm – 0.75mm of cervical curvature.
Forgoing a traditional wedge allows the papilla to act as a wedging force, while the anatomic shape means the matrix can be removed after photopolymerization with little to non interproximal finishing. This facilitated direct composite architectures that are conducive to papilla regeneration.
This modern view of cervical curvature is in sharp contrast to the outdated notion that prosthetic and restorative embrasures should be flat.
The Bioclear Matrix was then teased away from the patient’s tooth, and a bonding agent was placed. An initial small amount of flowable composite was then carefully injected at the gingival margin. By injecting flowable composite, rather than a paste composite, for the first increment lowers the risk of disturbing the matrices.
Dr Clark recommends injecting at both the facial and palatal.
Paste composite was then injected into the reservoir of uncured flowable composite, as per the injecting molding technique. The three resin components were then light cured together, before the teeth were carefully sculpted and polished.
Once the matrix was removed, a smooth and extremely durable surface was revealed.
As the video case shows, all spaces were successfully blocked with composite and the papilla was able to efficiently regenerate, without the need of surgery. The aesthetics of the patient’s smile were also significantly improved.
Closing Black Triangles Toolkit
When it comes to treating black triangles with the Bioclear Method, there are some crucial pieces of equipment you need in your toolkit. With the Bioclear Matrix Anterior Kit, you can offer predictable restorations every time.
Learn more and purchase your Bioclear Matrix Anterior Kit.
Clinical Tips
For more information and clinical advice when it comes to treating black triangles, check out our resources below:
.png)
The Problem
Class II restorations present several challenges to dentists, and the traditional technique for preparing and filling these restorations leaves them prone to:
– Leaking
– Chipping
– Wholesale fracture
– Recurrent decay
– Higher failure rates, when compared to amalgam
The classic cavity preparation designs first created by G.V. Black, one of the founders of modern dentistry in the US, represented a significant advance during his day. But that was nearly 130 years ago.
We are now seeing evidence that these shapes can weaken the dentition by contributing to tooth fracturing, despite the belief that composites will always strengthen the tooth.
The practice of applying several separately cured layers of composite in a deep and boxy preparation also creates risks for voids, gaps and seaming between layers.
 Residual stress will build in the tooth and restoration as the composite is layered.
In spite of careful layering, the composite often shrinks as the stress builds, to eventually create marginal gapping or enamel micro-fracturing. The only predictable way to mitigate polymerisation shrinkage stress is to modernise the cavity preparation with a modern prep.
Five more problems with posterior composites
The key problems with posterior composites can be summarised as:
1. Composite is a poor biological space filler. It needs to be sealed both 360°, and from inside to out.
2. Unlike amalgam and gold foil techniques, ‘packing composite into a hole’ is not a predictable method. Most of the features of the traditional cavity preparations, such as parallel walls and resistance and retention form, work against posterior composites.
Under the microscope, Dr Clark has observed that polymerisation shrinkage cannot be eliminated, only mitigated. The best margin is no margin – when composite extends slightly past the cavosurface margin, it is generally well-sealed with no white line. When we polish back to the margin, the white line often appears.
‘Composite sealing’ with thin resins applied after filling the cavity may reduce wear. However, trying to seal an imperfect margin after the fact is futile, as the white lines generally extend completely to the pulpal floor, far beyond the reach of a sealer.
3. C-factor has been oversimplified and remains a significant problem.
4. Posterior composites should go ‘on’ not ‘in’ the tooth.
5. Minimally traumatic dentistry should be considered as an upgrade of minimally invasive dentistry. The best longterm outcomes are more important than the race to minimise the micrograms of tooth structure that are removed.
For example, the tunnel preparation preserves the enamel of the marginal ridge but unnecessarily weakens the tooth and impedes clinical visualisation. Incomplete caries removal combined with excessive tooth weakening are unacceptable casualties of the noble mission to save marginal ridge enamel.
Thirty-five years after their inception, posterior composites remain unpredictable, but there is another way…
Best Practice Techniques
Most of today’s microfill and nanofill composite resins have excellent compressive strength, but relatively weak diametral tensile strength. With burnished metal matrices that are coaxed laterally to gain a contact, the contact ends up being too far to the occlusal and unsupported gingivally.
Sharp contact eventually leads to chipping, and is a result of one of two outdated placements…
 Option 1: Matrix and fill all the teeth in the quadrant at the same time
Taking this approach risks open contacts, due to the amount of space left over after the matrices are removed. As well as increasing the likelihood of recurrent decay and periodontal breakdown, open contacts can also cause chronic food impaction, pain, and disruption in quality of life.
Option 2: Place a matrix and fill one tooth at a time
This is a time consuming approach, and introduces the risk that one tooth will end up wider than it should, while its neighbour is too narrow.
Quadrant Strategy
It also increases stress when disassembling and reassembling the wedges and separators.
A new approach
To counter the problems often associated with Class II composite restorations, Dr Clark developed a technique for injection-moulded composite dentistry. This approach reduces the potential for voids and fault lines, while maintaining the structural integrity of the tooth.
 It involves the use of a redesigned cavity preparation, a translucent matrix system (Biofit HD), and the proper combination of paste and flowable composites to create strong and aesthetic restorations. This modern process ensures the treatment is better, faster, and more enjoyable than before.
The Clark Class II is an evolved version of previous modifications of the original G.V. Black preparation, such as the slot preparation.
There are 6 steps for ideal Class II composites:
1. Place rubber dam, apply disclosing solution, and blast with aluminum trihydroxide.
2. Pre-wedge, then cut modern cavity preparations.
3. Place Biofit matrices on all teeth, diamond wedges, and appropriate Twin Ring Separators.
4. Restore the “middle” tooth, and then remove the separators and matrices from the middle tooth. The wedges and the other matrices will usually not need to be disassembled or reassembled.
5. Replace the separators and restore the distal tooth. Remove the wedge, matrix, and separator from the distal tooth.
6. Restore the mesial tooth/teeth.
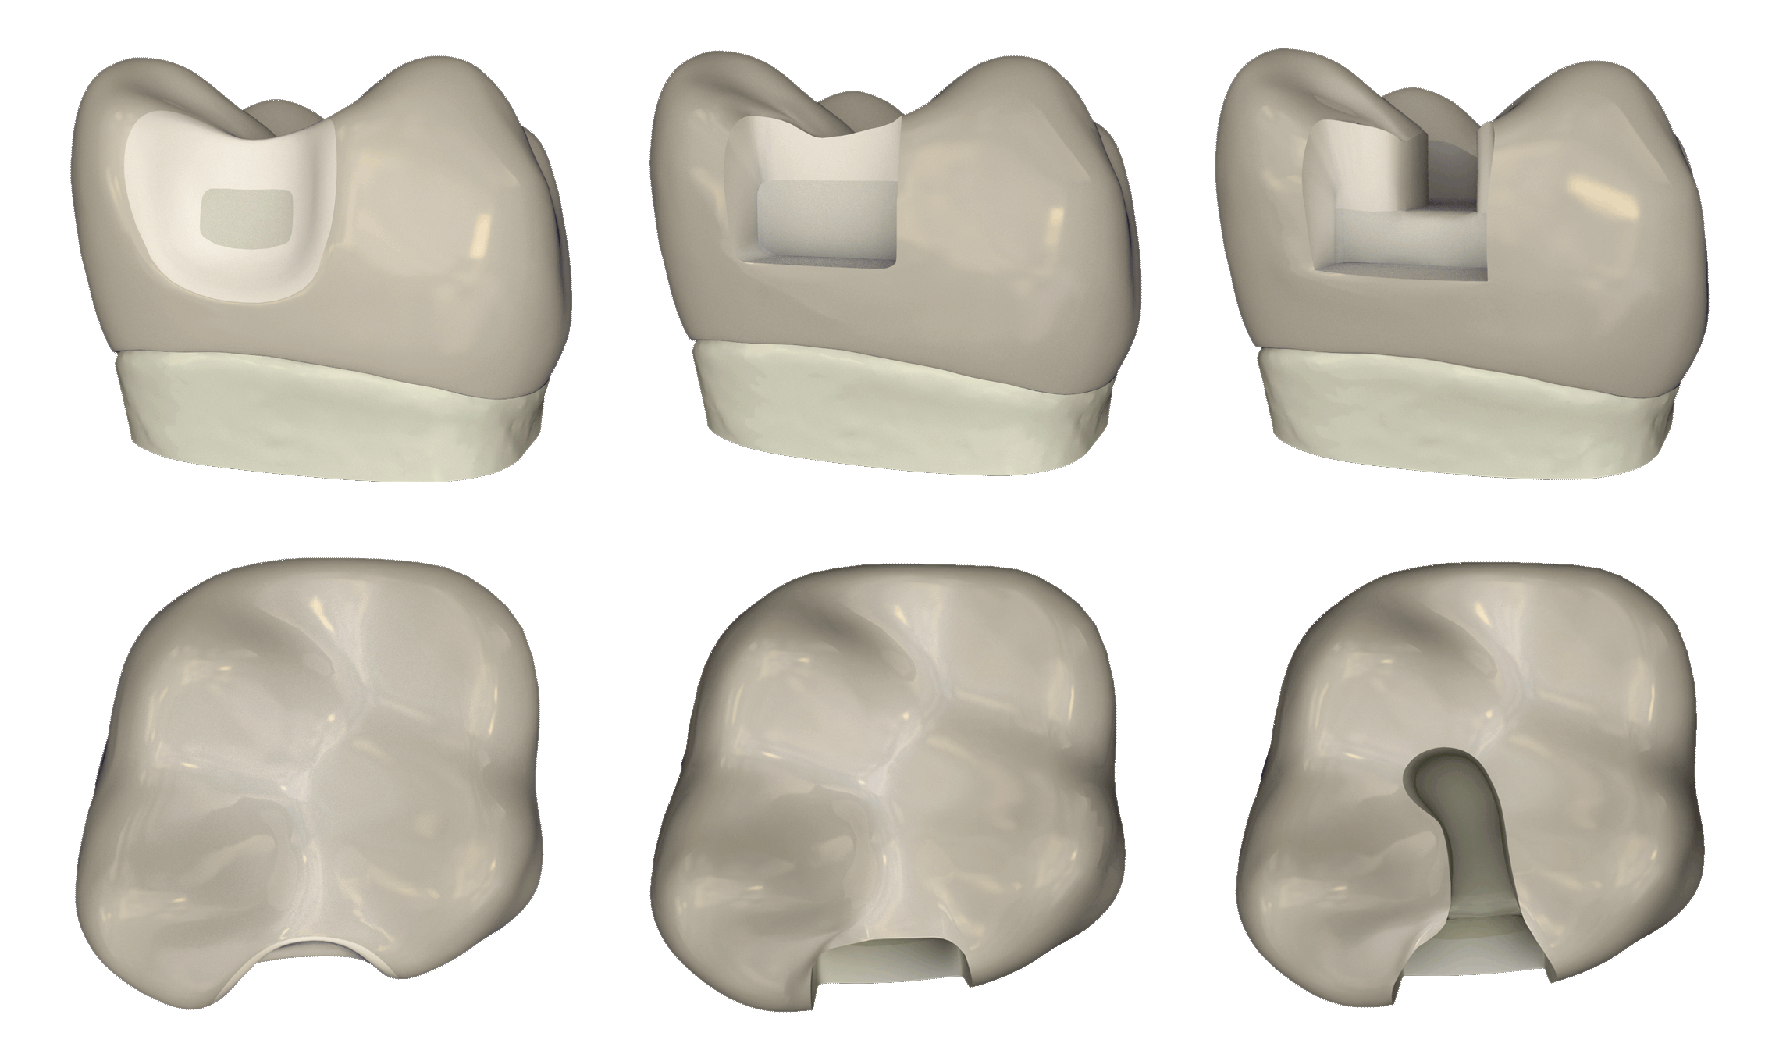
 Modified preparations
The configuration of the cavity plays an important role in the durability of the restoration.
The traditional boxy shape of a Class II preparation creates sharp internal line angles, promotes crack initiation, and leaves dentin vulnerable to fracture. This shape of preparation also makes the restoration prone to composite shrinkage, as the composite shrinks away from opposing walls of the preparation and creates gapping and/or stress.
Traditional wedges, matrices, separators, and boxy cavity preparations never offered the freedom to create the force needed to separate the teeth aggressively. The resulting contours of the restorations were also badly compromised by the shape and flimsiness of thin sectional metal matrices.
An additional consideration is that the G.V. Black, or slot, preparation maximises bondable dentin surfaces while minimising the bondable enamel surface area.
However, with a redesigned preparation that is flat and shallow, the typical C-factor problems are eliminated or mitigated…
A saucer-shaped preparation with feather edges avoids the sharp angles of the traditional preparation. This method also allows the composite to act in a new way on the tooth – sitting ‘on’ the tooth instead of ‘in’ it.
This shallower preparation allows the composite to be injected in one phase instead of increments, which saves time and, more importantly, eliminates the risk of gapping between layers.
Translucent matrix system
Injection-moulded composite dentistry requires the use of a new kind of matrix system, which uses translucent matrices (Optident). These matrices make it possible to perform buccal lingual curing, and also facilitate single-load filling.
While traditional metal matrices allow curing only from the occlusal surface, a translucent matrix allows the composite to be cured from both buccal and lingual angles. The two sides can be cured simultaneously with two lights, ensuring you get a thorough cure of up to 5mm.
This new kind of matrix system is an important advancement in posterior restorations as it allows for improved injection pressure, less need for hand manipulation of the composite, and a drastic reduction of dangerous and time-consuming occlusal embrasure grinding.
Balanced use of paste and flowable composites
With a minimally invasive cavity shape, the resultant space is difficult to fill strictly with paste composite. The preparation in this technique is shaped like a saucer instead of a hole, and because paste composite is so heavy, it does not easily flow into deep areas.
To address this issue, dentists often make the mistake of relying too heavily on flowable composites, which have inherent weaknesses:
– They are more prone to shrinkage than paste composites.
– They are typically not as strong as pastes.
– Flowable composite near the occlusal surface is also more likely to wear than paste composite.
However, flowable composites can be extremely useful when applied in moderation.
By marrying flowable composite with paste, the practitioner is able to mitigate the shortcomings of flowable while maximising its superior handling characteristics.
Some researchers refer to the ‘snowplow technique,’ in which the flowable is placed first and not cured separately, followed with a paste composite injected into the flowable. This is then ‘squeegeed’ out of the sides of the restoration.
These researchers have found that this technique can improve adaptation and also lessen the chance of marginal leakage, versus separate layers of flowable. The snowplow was a precursor to injection moulding.
Injection-moulded technique
Before beginning the technique, if a significant amount of dentin is present, that dentin is either covered with glass ionomer or dentin bonding agents.
The injection-moulded composite dentistry technique requires first applying a bonding resin to both the previously treated dentin and freshly etched enamel inside the matrix. Then, a flowable composite is injected into the pool of bonding resin, before injecting the paste composite.
The resin-flowable-paste mass is polymerised together in a single light-cure.
Dr Clark aims for the paste composite to make up 80% to 90% of the overall volume of the filling, while flowable should account for 10% to 20%.
With traditionally boxy preparations, it is common to see restorations made up of 50% to 70% flowable composite. That amount (greater than 25%) of flowable can be a liability for the dentist and patient; these volumes can contribute to unacceptably high rates of marginal ridge fracture, and complete filling dislodgement.
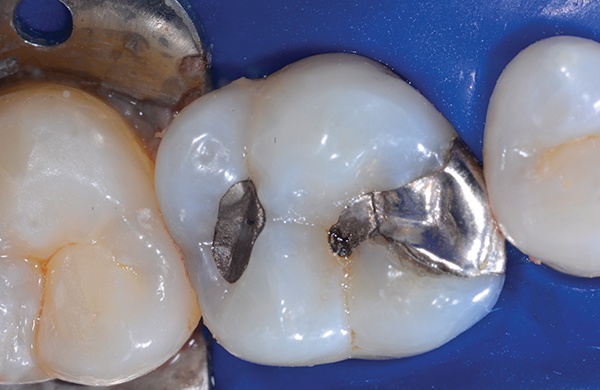
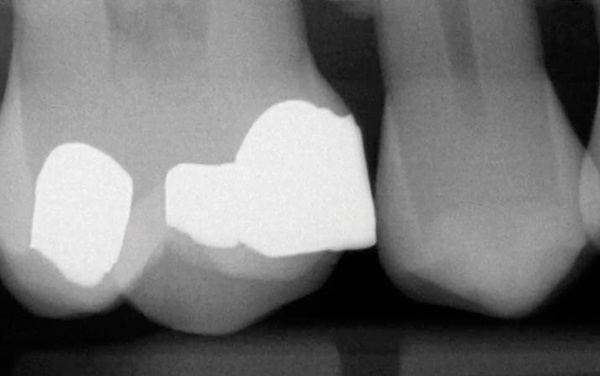
Clinical Case Study
A 45-year-old man presented with a failing, 30-yearold amalgam restoration. The tooth had an incomplete fracture on the mesiobuccal cusp, and the amalgam was cracked. The patient also had a history of mild tooth sensitivity, to the cold and when chewing.
 In the past, crowns have been the go-to option when working in the posterior. As composite materials have improved, however, so has their popularity during restorations.
The treatment discussed and agreed with the patient was a direct composite restoration using Filtek One Bulk Restorative. As well as offering the patient a predictable and minimally invasive solution, combining this with the Biofit Matrix is also extremely profitable.
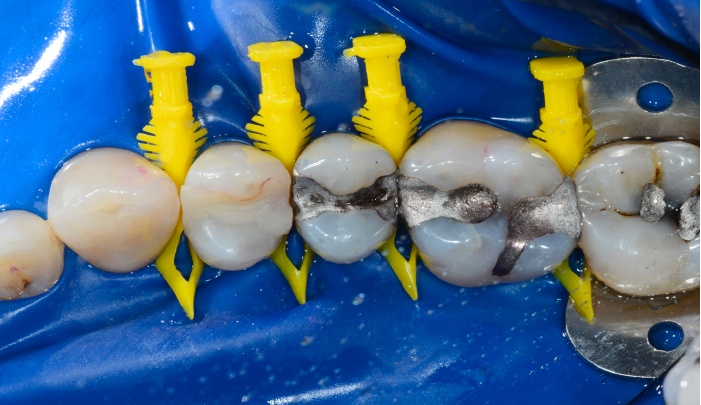
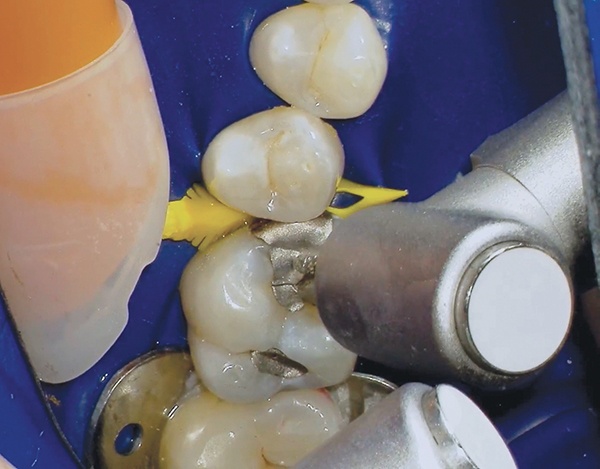
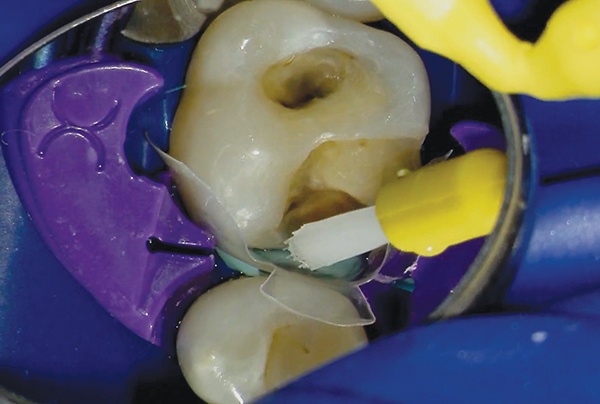
Pre-wedging
Anaesthesia was applied, and the Bioclear Blaster was used to remove any biofilm present. As well as reducing staining, it allows for a much better bond on the infinity edge. This benefits the blend of the composite margins.
The large, yellow diamond pre-wedge was then placed to make the initial separation of the teeth, while protecting the interproximal tissue as well. It is a simple but vital step for bonded restorations.
 Cavity preparation
The pre-wedge was removed, and the interproximal area was sanded with a Lightning Strip (Integra, Miltex). The cavity preparation area was then re-blasted to clean 360 around the tooth, ready to fit the Biofit Matrix.
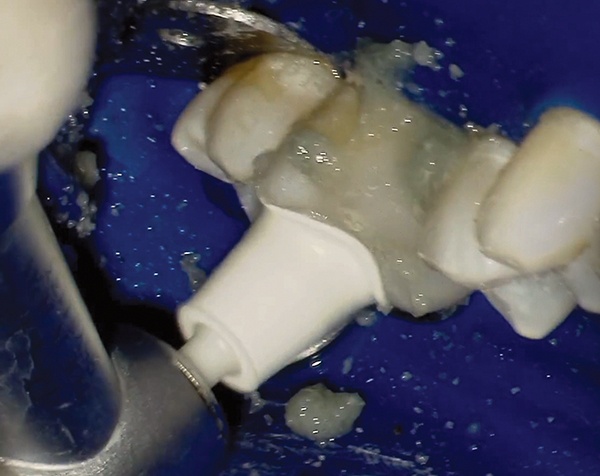
Injection moulding
Before the advent of the IMC technique, enamel areas needed to be bonded and light-cured before flowables or pastes were applied. The injection-moulding technique, however, streamlines these steps:
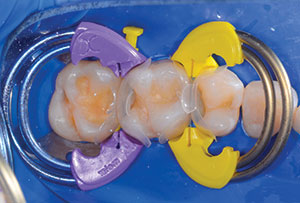
1. The Biofit Matrix was fit using the Biofit 6.5mm matrices, extra large diamond blue wedge, and the molar twin ring. To optimise this contact area, the matrix was expanding and apposed.
2. Using a total etch technique, the etch was left on the enamel for approximately 20 seconds, and 10 seconds after rinsing and drying.
 3. The 3M Scotchbond Universal Adhesive was massaged into the dentin for 20 seconds, before being lightly air dried. It was then light-cured.
4. The adhesive was then reapplied as a wetting agent and air dried, but not light cured.
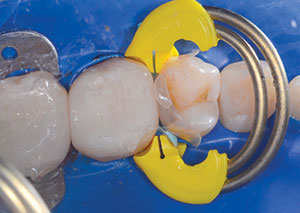
5. A small amount of 3M Filtek Bulk Fill Flowable Restorative was injected into the adhesive along the buccal, lingual, and gingival margins.
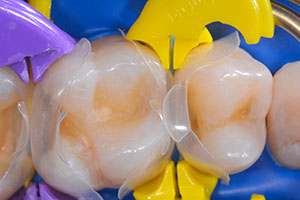
6. Filtek One Bulk Fill Restorative was then injected into the uncured flowable composite to achieve the ideal adaption. As the Filtek One Bulk Fill Restorative material makes up the majority of the restoration, the end result is strong and smooth.
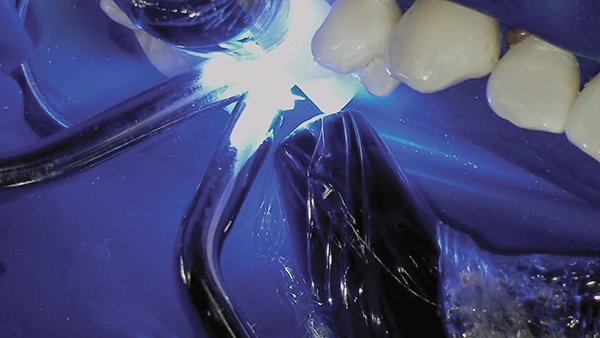
Curing the composite
Filtek One Bulk Fill Restorative relies on a three-point curing process (from the occlusal, buccal, and lingual surfaces). This process is enhanced by the translucent Biofit Matrix, which allows the buccal and lingual surfaces to be cured while the matrix is in place.
Three-point curing is crucial for achieving true 5mm depth of cure in the interproximal. The Bioclear Biofit matrix for class II restorations is unique because it allows buccal lingual curing. A clear matrix is a major advantage.
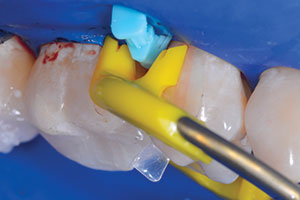
 The tooth structure was then sculpted with the 3M Sof-Lex XT course disc – a centerpiece tool in the Bioclear Method.
Pre-polishing was carried out with a dual abrasive Magic Mix Pre-Polisher (Bioclear), followed by polishing with a diamond impregnated high shine cup. The shine achieved is often referred to as the “Rock Star Polish”.
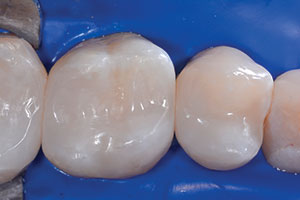
Discussion
The patient was very pleased with natural and aesthetically pleasing composite resin restoration.
The world of dentistry now requires clinical efficiency, as well as the ability to provide results that are long-lasting and beautiful. And so it has never been more important to perform efficient procedures.
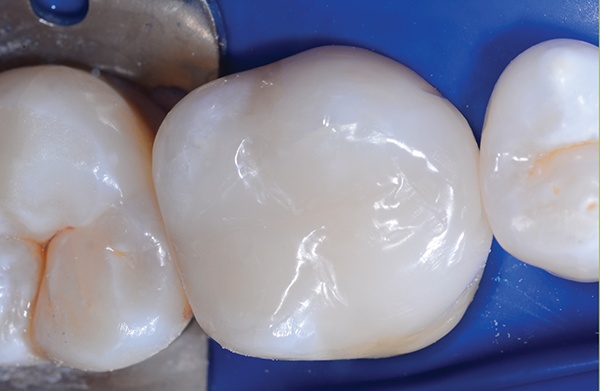
 While earlier formulations of bulk fill composites were less aesthetically pleasing because of their translucency, modern products offer a decided advantage. Composites like 3M Filtek One Bulk Fill Restorative allow dentists to penetrate 5mm of material with a curing light, yet turn more opaque as it cures for an enhanced aesthetic result.
Modern approaches and products have made the bulk fill restoration process much simpler and faster, which saves time for both clinicians and patients.
Video Case
“The only way to stop a tooth from fracturing during the lifetime of the tooth is to use a less damaging solution.” Dr David Clark DDS
Age-old cavity preparations predispose the tooth to fracturing, and composite resin materials do not help to prevent it. The only way to stop a tooth from fracturing is to switch up the preparation, to a less damaging solution.
In this video case, Dr Clark compares the G V Black cavity preparation to advanced modern techniques like infinity edge margins and saucer…
Modern Class II Cavity Preparations – Bioclear Matrix System from Optident Ltd.
Class II Restoration Toolkit
Arm yourself with the right equipment and offer your patients accurate Class II Restorations. With our Bioclear Matrix Posterior Kit, you can offer advanced restorations every time.
Learn more and order your Bioclear Matrix Posterior Kit today.
Clinical Tips
For more information and clinical advice when it comes to treating Class II restorations, check out our resources below:
One Man Transforming Modern Dentistry – An Interview with Dr David Clark
How Bioclear Matrix Has Challenged Age-Old Thinking About Treatment Of Caries
.png) Treating Peg Laterals and Closing Diastemas
Treating Peg Laterals and Closing Diastemas
The Problem
Treatment of a peg or undersized lateral incisor is a relatively common dilemma, with reported incidences of peg and undersized lateral (combined) at 4% to 5% of the population (3) . Peg and undersized laterals often cause unsightly ‘unfamiliar negative space’, as discussed in part one of this ebook. Because the lateral incisors are disproportionate to the incisors alongside them, it is crucial to grow the volume of the lateral.
People with malformed lateral incisors often display a diastema in the midline region caused by the distal movement of the central incisor. There are many acquired and inherited developmental abnormalities that alter the size, shape and number of teeth.
As orthodontist, Dr. Jerrold S. Johnson, Tacoma, WA, USA says,
“A tooth size discrepancy caused by narrow maxillary lateral incisors is a very common problem faced by orthodontists. Changing the tip and torque of the maxillary incisors or reducing the mesial distal dimensions of the lower incisors can often solve the discrepancy without the need for future maxillary restorations. However, when the discrepancy is large… restorations are a necessity.”
To date there has been so much focus on diagnostic wax ups, proportionality rules and nuances of multiple shading of porcelain or composite, for example. So much so, many general dentists don’t feel they can afford to give this challenge the time and energy it needs.
But there is a solution…
Best Practice Techniques
“The Bioclear approach is injection overmoulding. Instead of just patching the tooth – as happens in bonding – the Bioclear Matrix and method allows the entire tooth to be overmoulded with variable thickness composite.” Dr David Clark DDS
Many dentists using Bioclear Matrix have commented that the ideal and varied shapes of the matrices have allowed them to throw away their diagnostic wax-ups and move on. This is a bottom line approach. The spaces must be closed.
The matrix dictates the appropriate shape and emergence profile. The restoration must be smooth, strong, and healthy, and the change in emergence profile must begin sub-gingivally, which requires the use of a diastema closure matrix.
 Trimming the Bioclear Matrices
We have discovered that for young patients, the gingival apron needs to be trimmed with the Bioclear Matrix micro-scissors to duplicate the significant rise and fall of the attachment. These instructions are spelt out in the user’s guide and online (Bioclearmatrix.com).
This quick but crucial modification allows the matrix to seat up to 3mm deeper and fit more accurately and comfortably.
Challenging the wisdom of layering
Layering is often the enemy of the good.
Patients want colour uniformity – bright but believable colour. They want no cutting of the tooth, no porcelain, no tissue inflammation, no black triangles, no staining, no roughness, no fractures and an assurance that the restoration will be as strong as porcelain.
In his practice, Dr Clark personally guarantees the Bioclear Method for ten years against stain and de-bonding, while Dr Clark’s warranty on porcelain is only five years.
Dentists should be confident that these over-moulded restorations will hold up as well as porcelain, yet most dentists can’t satisfy that list with hand stacked multi-shade composite. The driving forces are the patient and the soft tissues, and layering is more artistic than is necessary to meet patient needs. Invariably, dentists find the layering procedure unprofitable and disappointing to patients.
While the Bioclear Matrix allows layering, it isn’t a compulsory part of the technique.
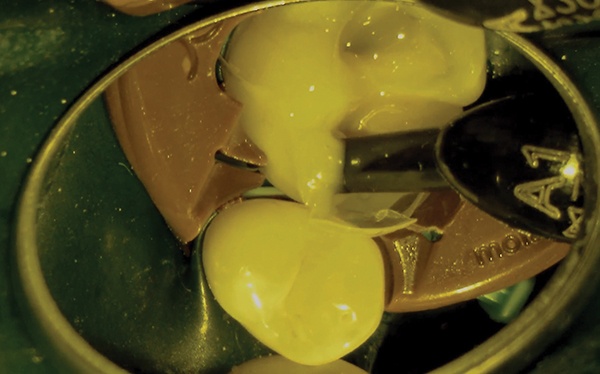
Balancing translucency and opacity
Many of Dr Clark’s cases are restored with Filtek Supreme Ultra Body flowable and regular composite. Many patients undergo tray bleaching before the teeth are restored, which allows the routine use of B-1 body composite. The 3M body shade is a perfect balance of translucency and opacity, while the flowable matches the regular composite perfectly.
Blasting
Blasting is a less abrasive alternative to air abrasion, which uses very aggressive aluminium oxide.
In order to adequately remove biofilm, the teeth are painted with disclosing solution and then meticulously blasted with pressurised aluminium trihydroxide (Bioclear Blaster, Optident). Phosphoric gel etchant alone cannot be relied upon to remove plaque to achieve an ideal bond to enamel or dentin.
Rubber dam utilisation is often dismissed for anterior aesthetics. In most cases, the amount of interproximal gingival retraction afforded by the rubber dam is ideal for predicting the amount of static tension needed to generate or regenerate a papilla. The rubber dam also protects the soft tissues when blasting is performed to remove tricky biofilm.
Once the central incisors are overmoulded using Bioclear matrices, they are measured and sculpted with a rough finish.
The Clark 3 Step Polish
The Bioclear Method is unique in that the loading zone is left with intentional excess. The difficult areas, such as the interproximal and sub-gingival, are like porcelain, thanks to the Mylar finish. The goal is then to safely and quickly grind back the loading zone, do a matt finish on the injection zone with a coarse disk, and marry it to the glassy, smooth Bioclear Mylar finish zone.
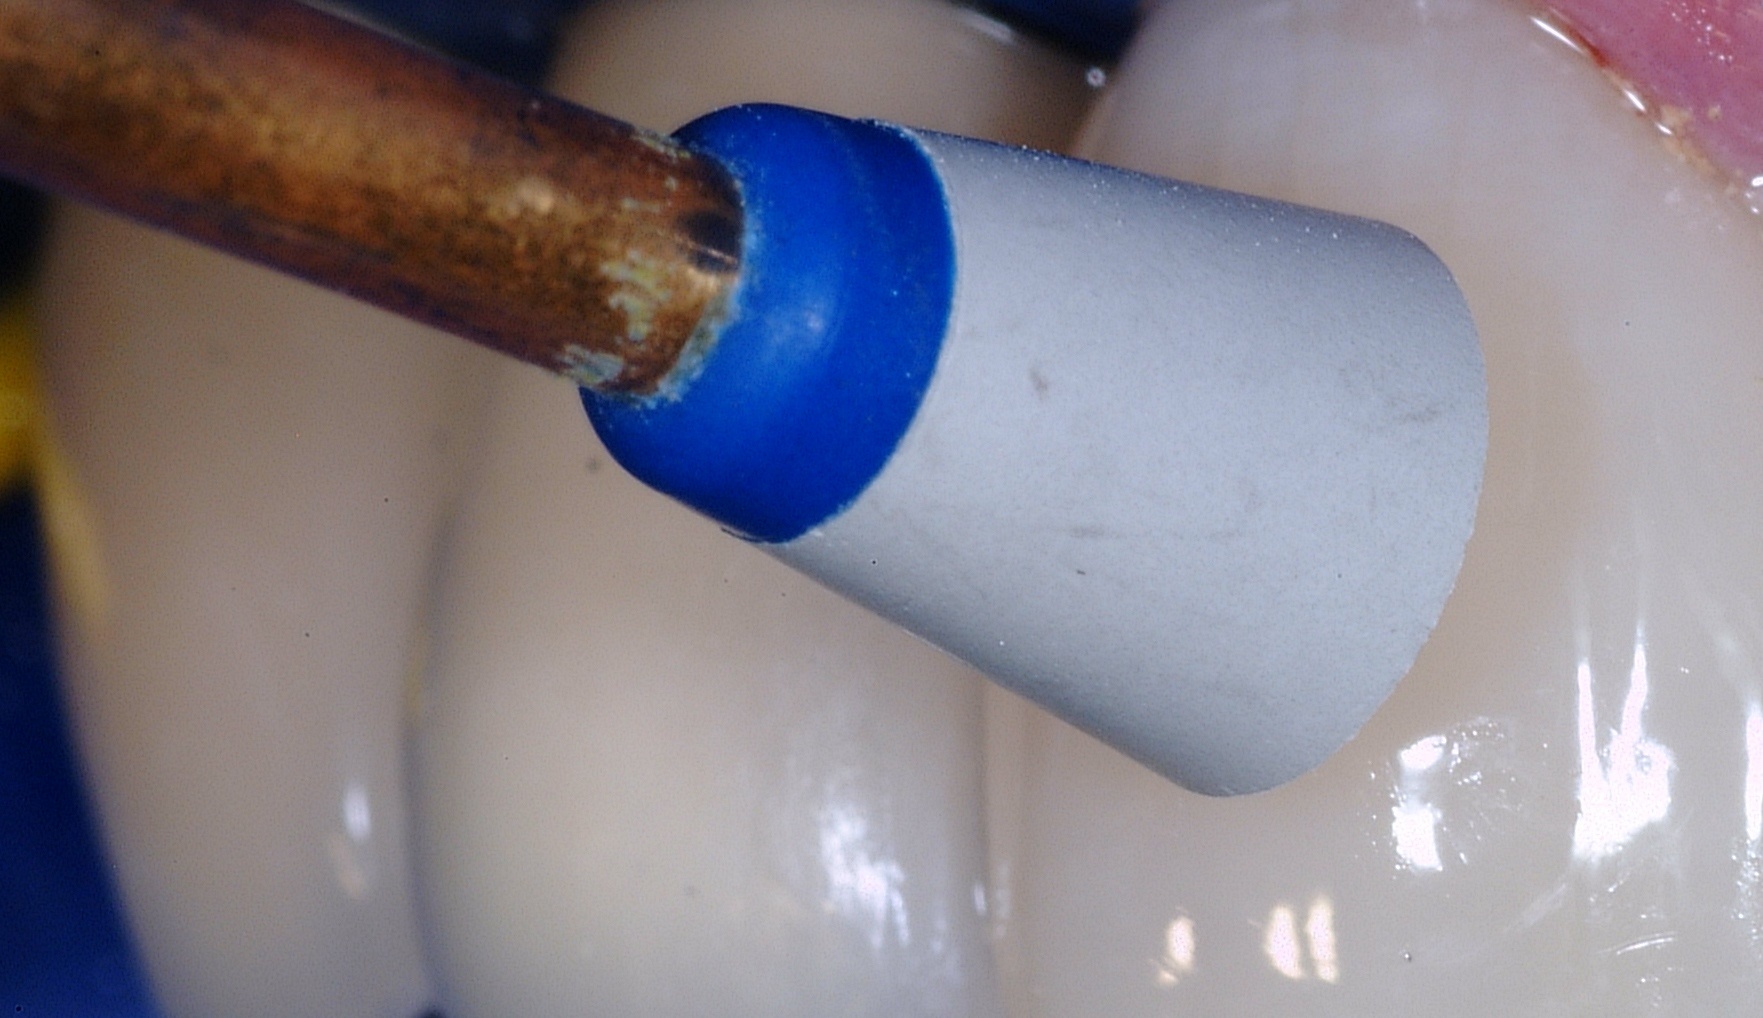
The three step polish is:
1. A course Soflex ET disk (3M)
2. Magic Mix, Optident and disposable cup
3. The Shape and Shine cup by Clinicians Choice, Optident.
This results in a patient-friendly, strong and incredibly stain resistant finish.
Dr Clark’s research and follow up studies have shown that if the incisal edge of the composite is at least 1.5mm tall (in occlusal -gingival dimension) and 2mm thick (in Buccal – lingual) dimension, and the entire tooth is over-moulded, dentists can expect close to zero incisal edge fractures. In the same way that monolithic porcelain like lithium di-silicate (EMax Press) and full Zirconia crowns don’t break, monolithic (non-layered) Bioclear Method composite overmoulding is very durable.
Colour uniformity
Most of today’s porcelain veneers are fabricated as monolithic (one single shade/type) ceramic, with either pressed or milled ceramics. While these monolithic porcelains are durable, they are generally more monochromatic than the older style, hand stacked porcelains.
Any significant multichromaticity is achieved with staining that has a limited lifespan. In short, the dental industry has moved to colour uniformity; patients like it and dentists love the strength.
Age matters
Bioclear Matrix over-moulded composites versus ceramics is a big discussion point. A good rule of thumb is that age matters; if a patient is under 40, Dr Clark suggests composite first. Over the age of 40, either porcelain or composite is great. The true infinity edge (feather edge on nonprepared enamel) margin is only possible with direct composites. A composite margin can easily be thinned and polished to have an almost microscopically imperceptible margin.
Composites’ infinity edge benefits both colour matching and pink aesthetics, and nearly always has better gingival health than microscopically fitted porcelain margins.
Properly done, the Bioclear Matrix and method is superior to porcelain for young post-ortho patients, to complete injection overmould cases with undersized incisors.
Clinical Case Study
Peg Lateral Treatment Using The Clarkmatrix
Having recently finished orthodontic treatment, this patient showed ideal tissue response for treatment using the Bioclear Matrix System.
 While the peg laterals could have been treated with porcelain laminates, this was not the primary treatment option based on contraindications like orthodontic staging, patient age.
There was also a more cost efficient and ethical alternative available, which the patient opted for – direct composite using The Bioclear Method.
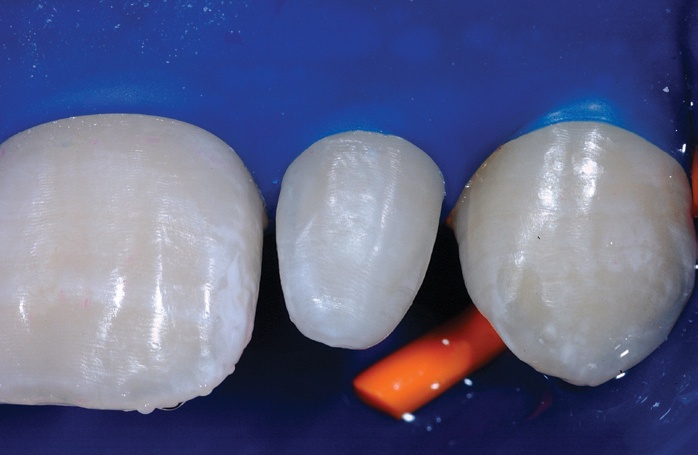
The Rubber Dam
A rubber dam was placed in order to provide interproximal gingival retraction, and help predict the amount of static tension needed to regenerate the the papilla. An aluminium chloride astringent was placed underneath the dam and burnished into the sulci to control crevicular fluids for 15 minutes. When removed, the tissue rebounded and the tissue contour became extremely favourable.
 Diastema Closure Matrices
The teeth were painted with disclosing solution and sprayed with pressurised aluminium tri-hydroxide / water mix using the Bioclear Blaster (Optident) to remove the biofilm.
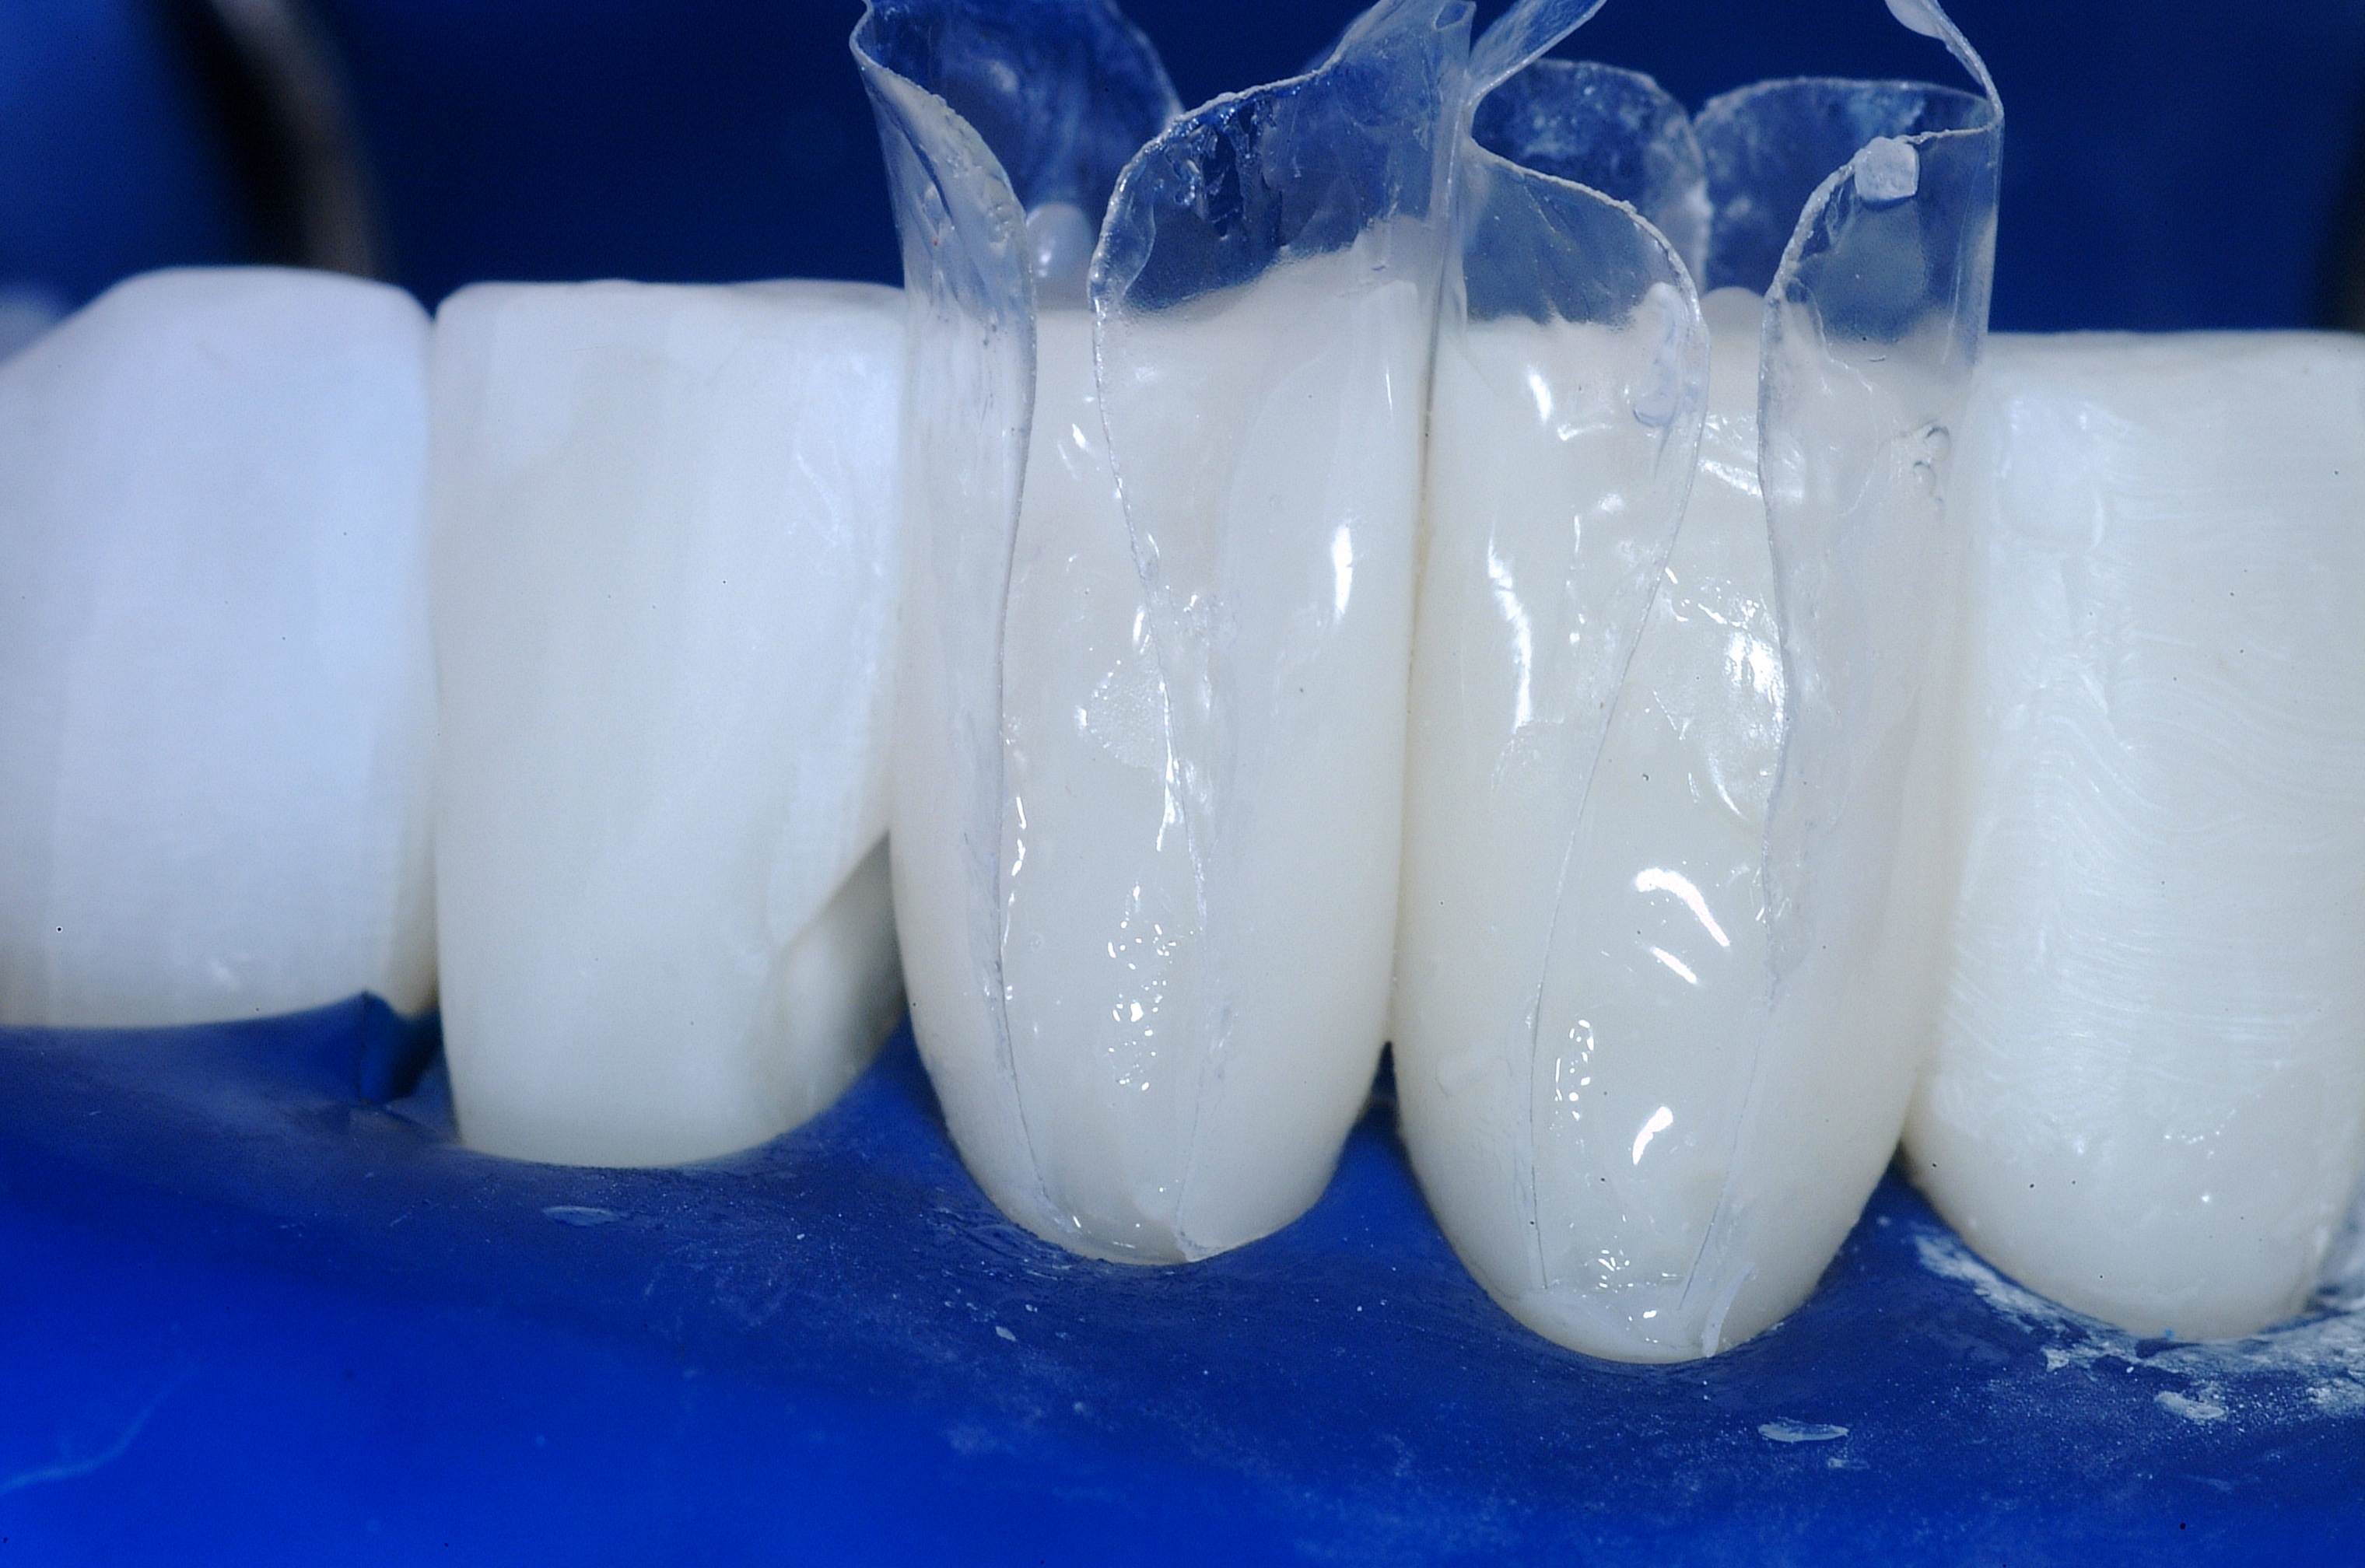
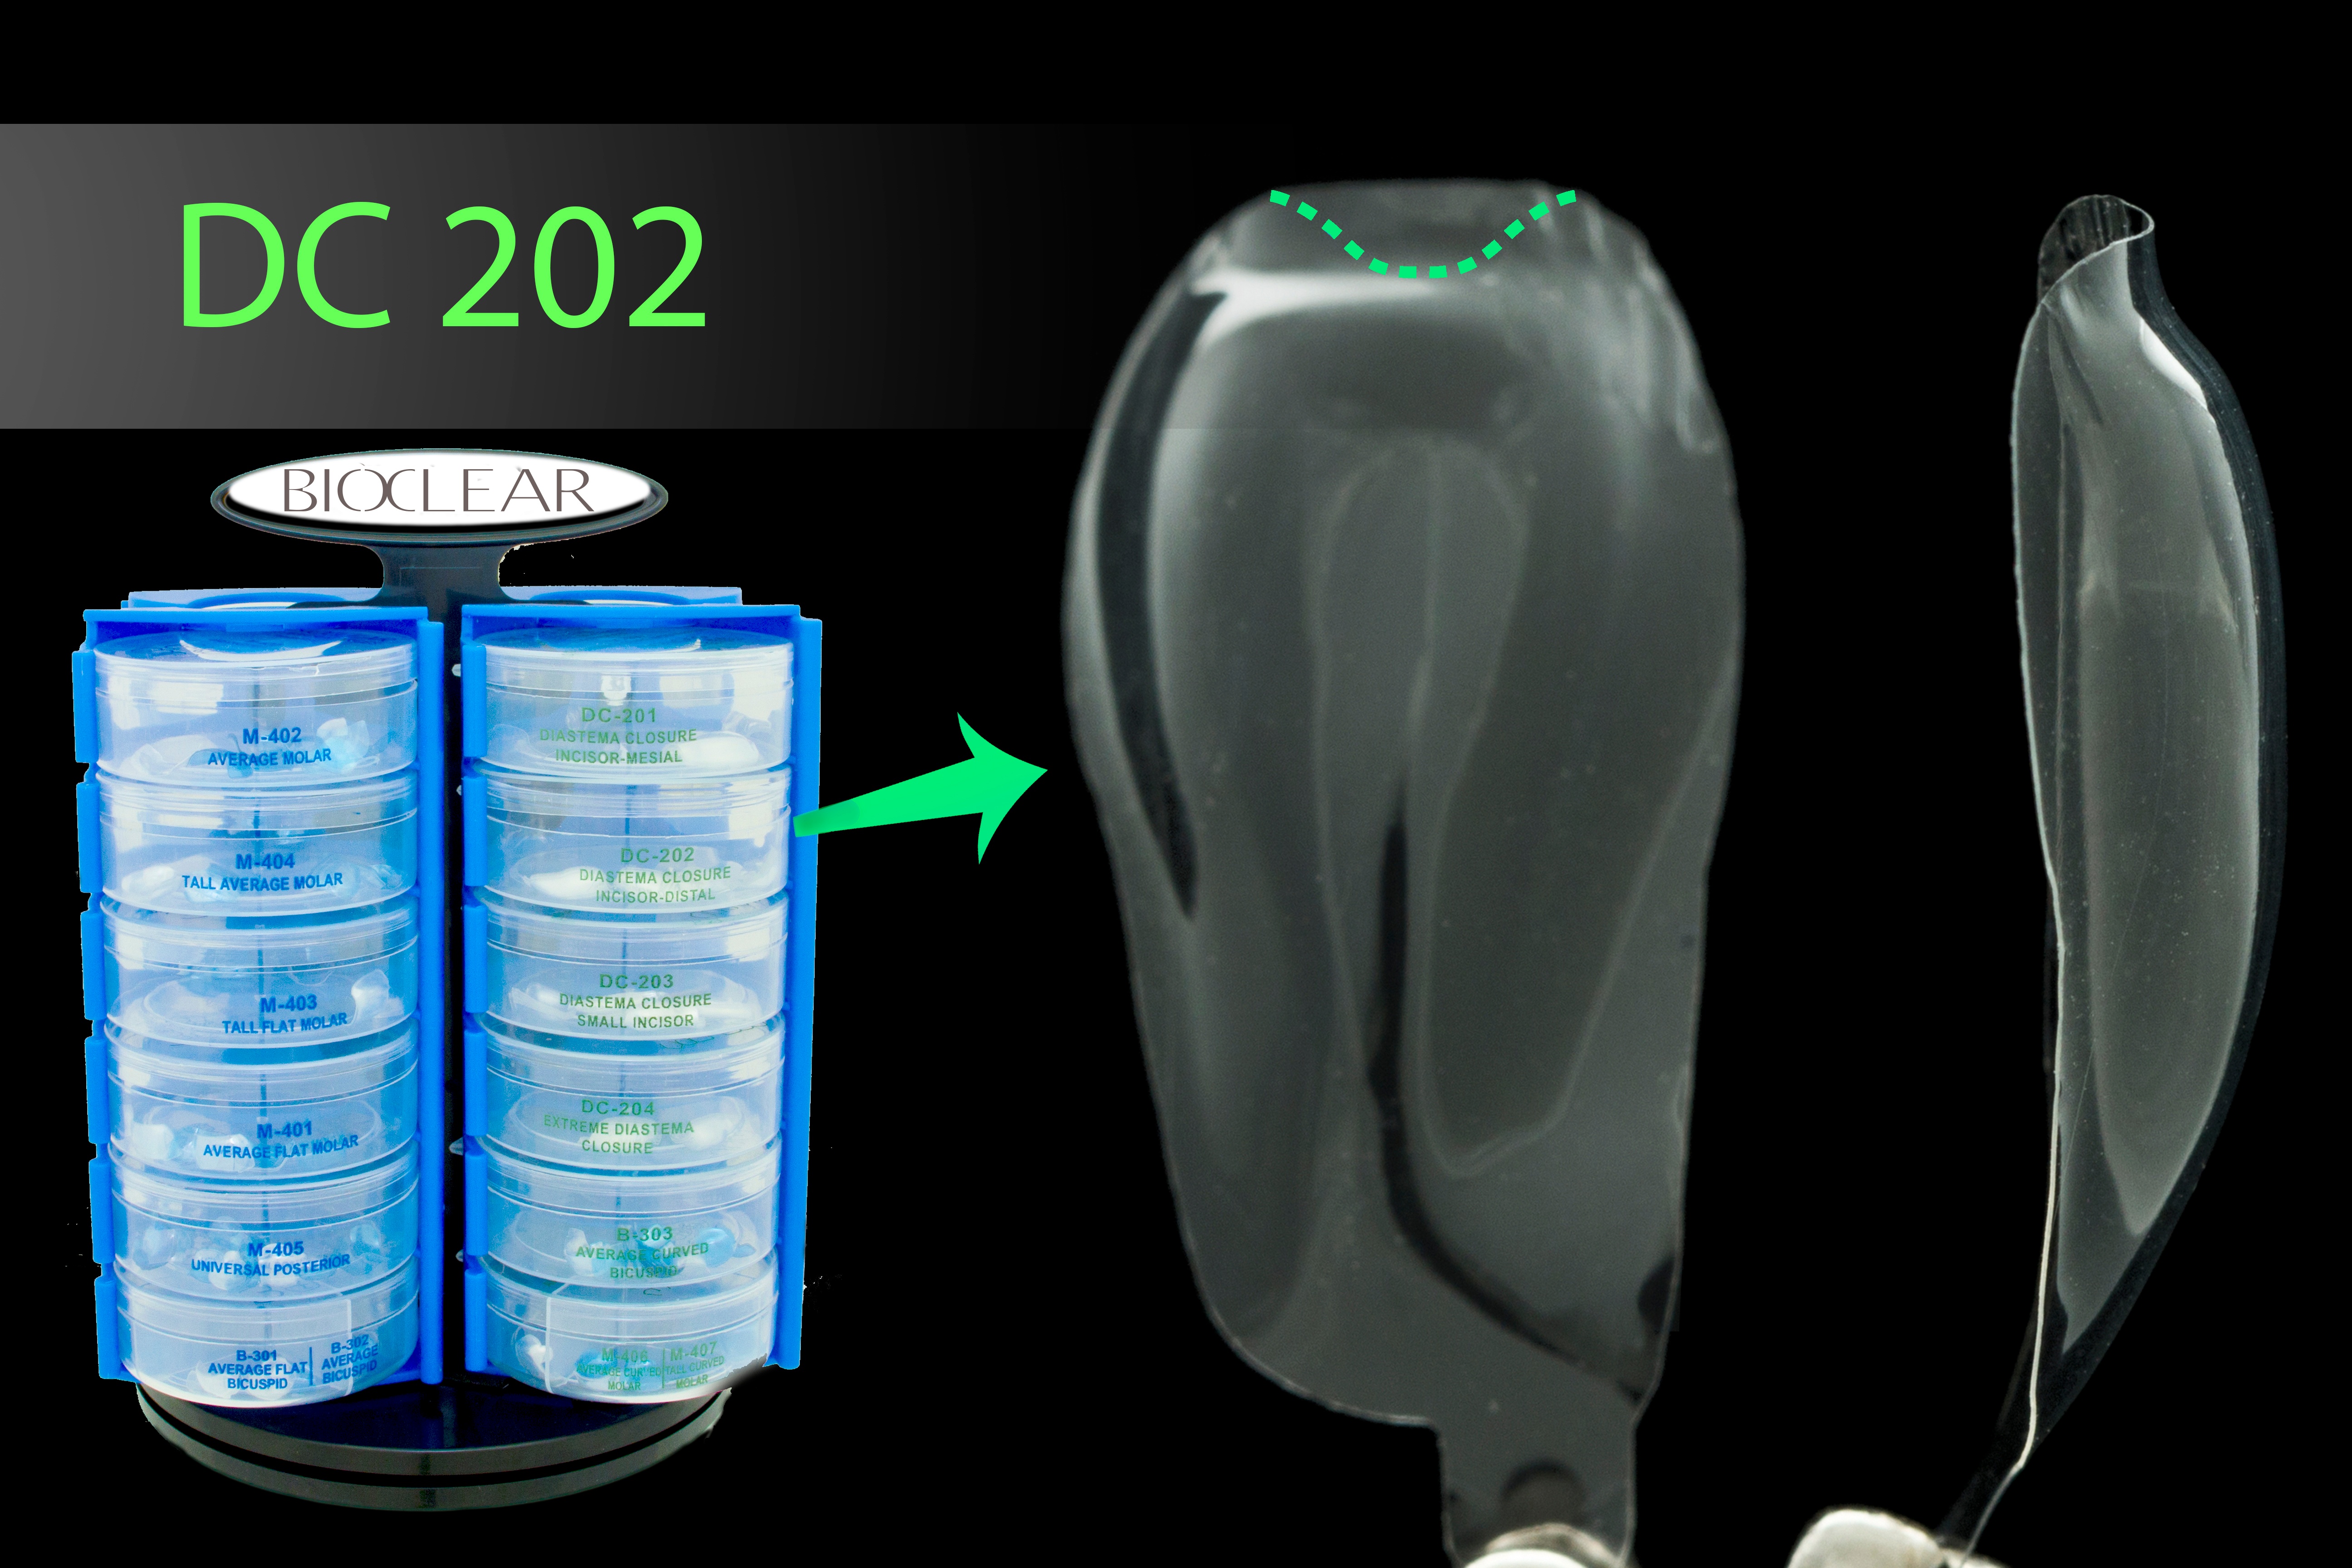
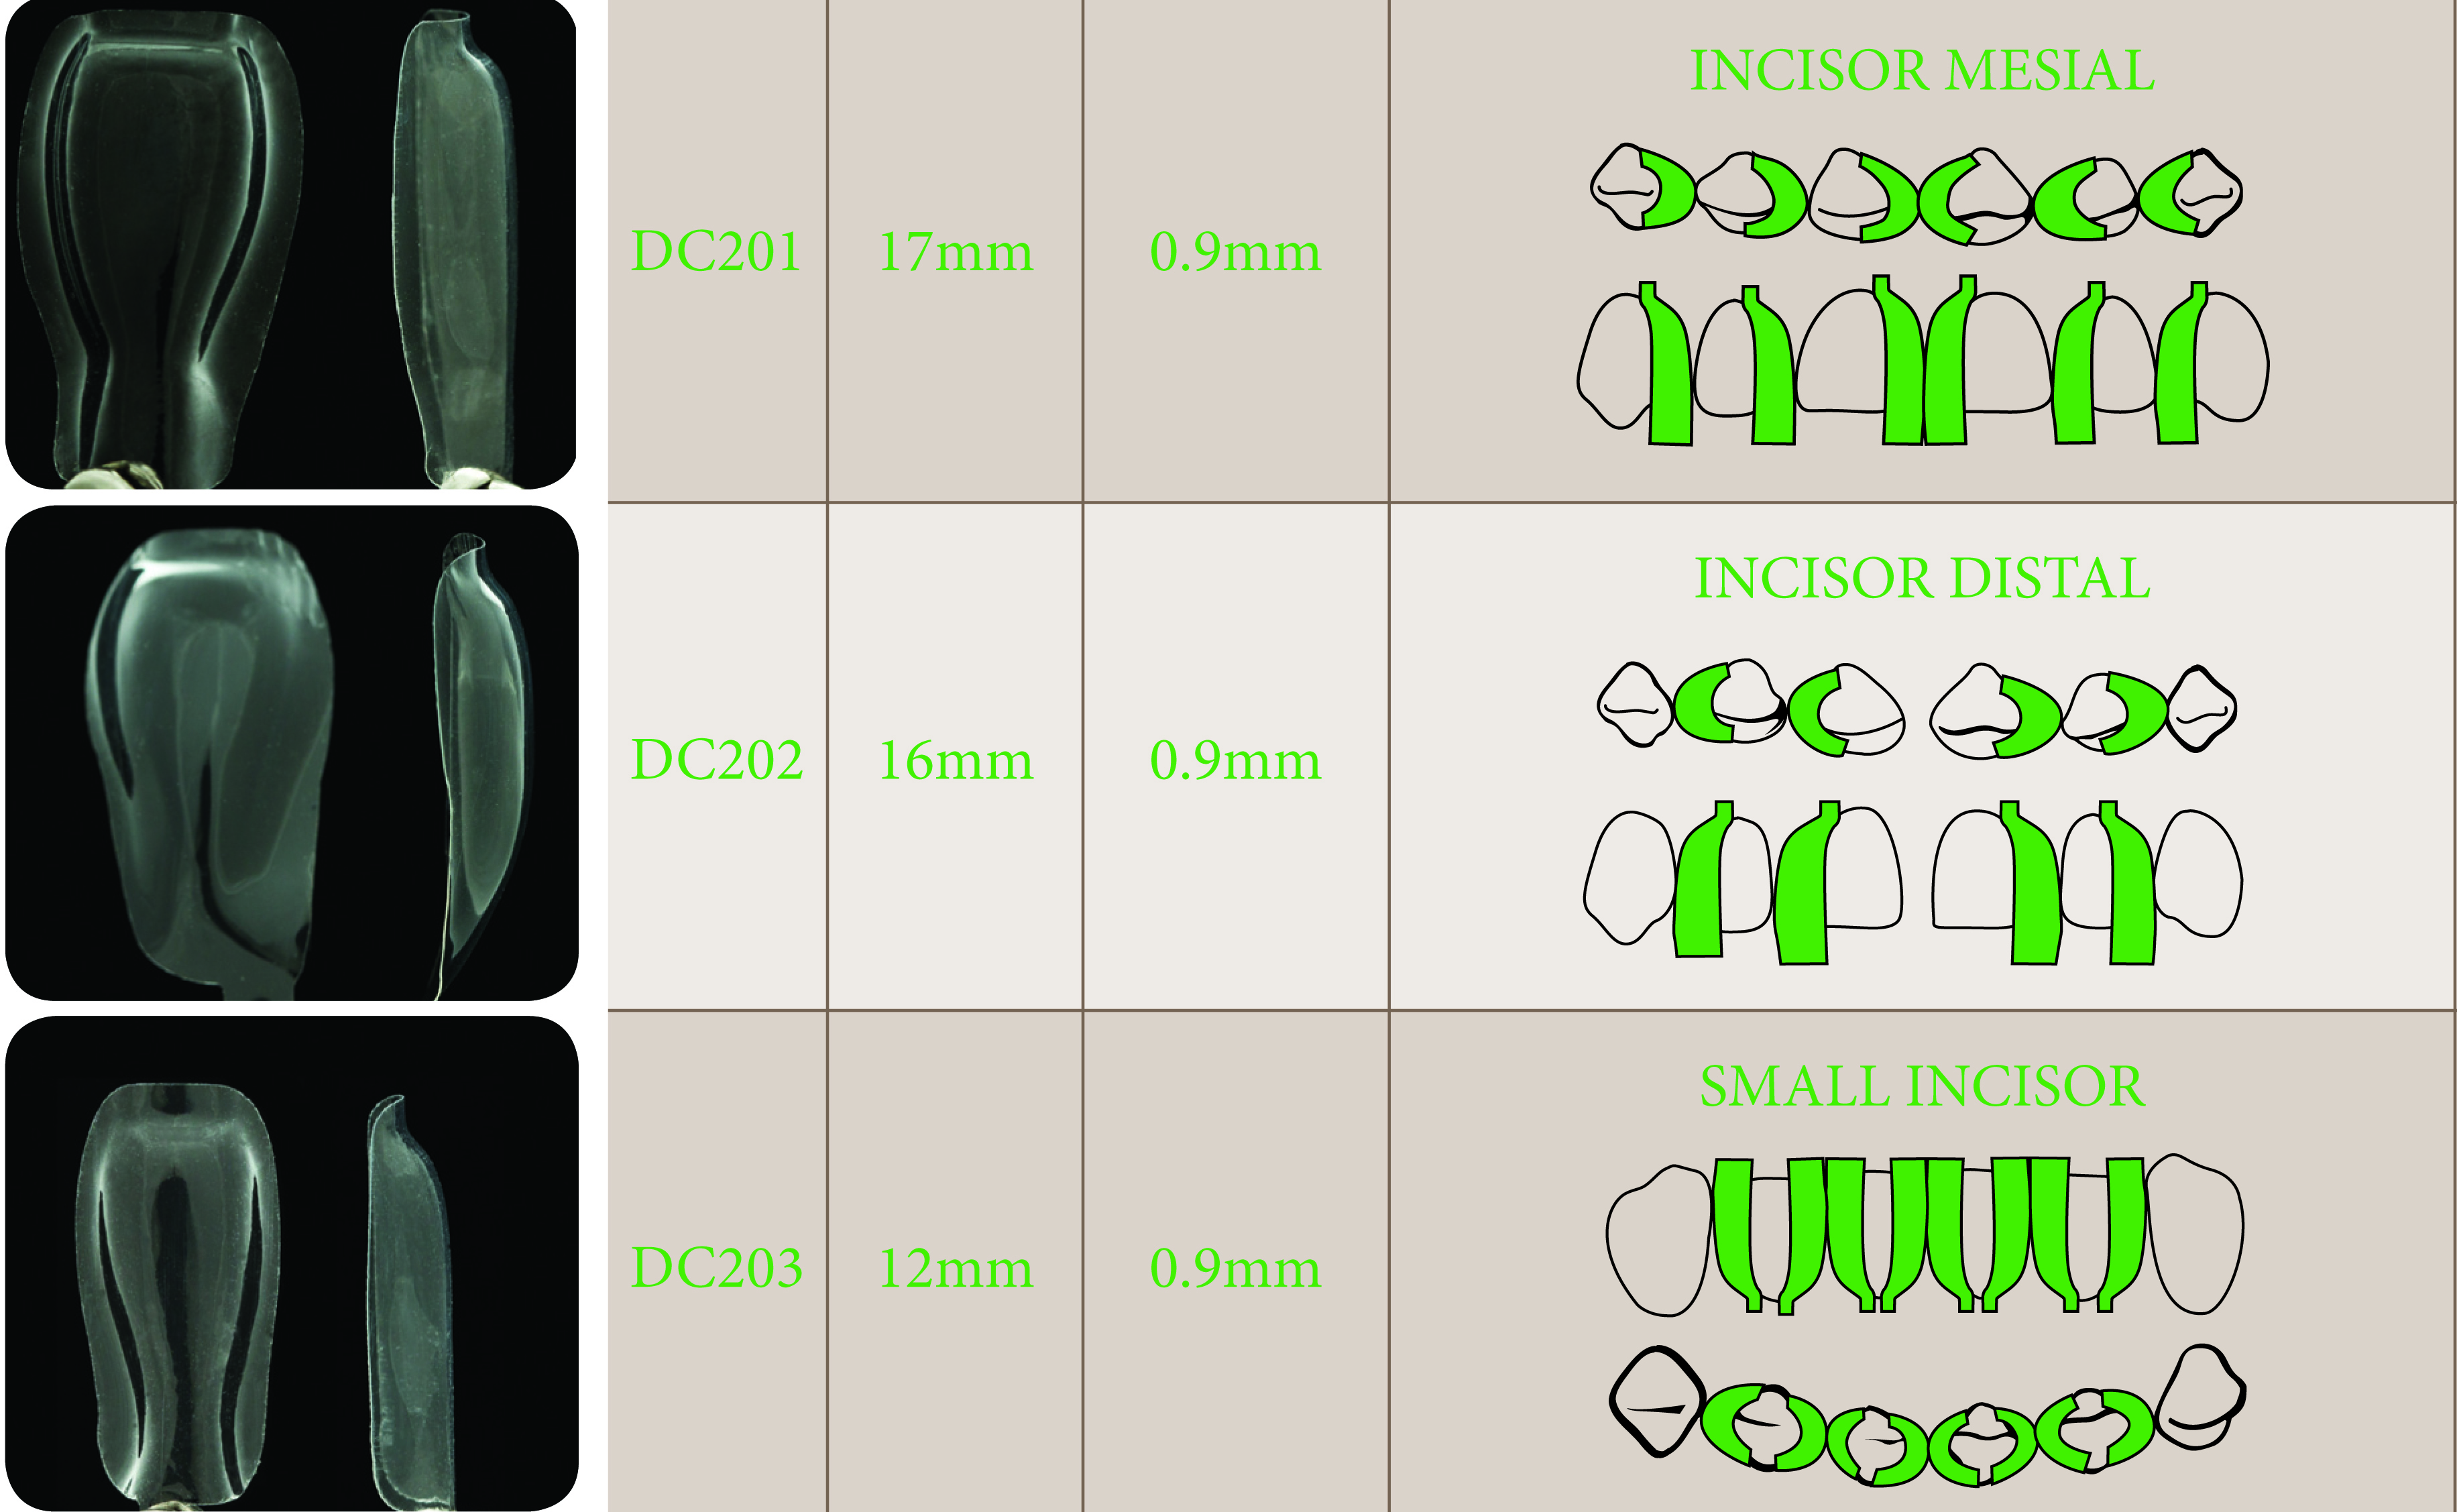
Then, two dedicated Bioclear DC-202 diastema closure matrices were inserted inciso-gingivally to the point where the gingival aprons on the matrices were near the depth of the sulcus.
Wedging, Stage 1
For this procedure, only the gentle cuffing pressure of the rubber dam and self-sealing action of the Bioclear Matrix was needed to seal the gingival margin.
A wedge should not be used as this risks deforming the pre-curved matrix.
 The teeth were then etched with 37% phosphoric acid, rinsed and dried. A thin layer of bonding resin was then placed and air thinned, but not cured.
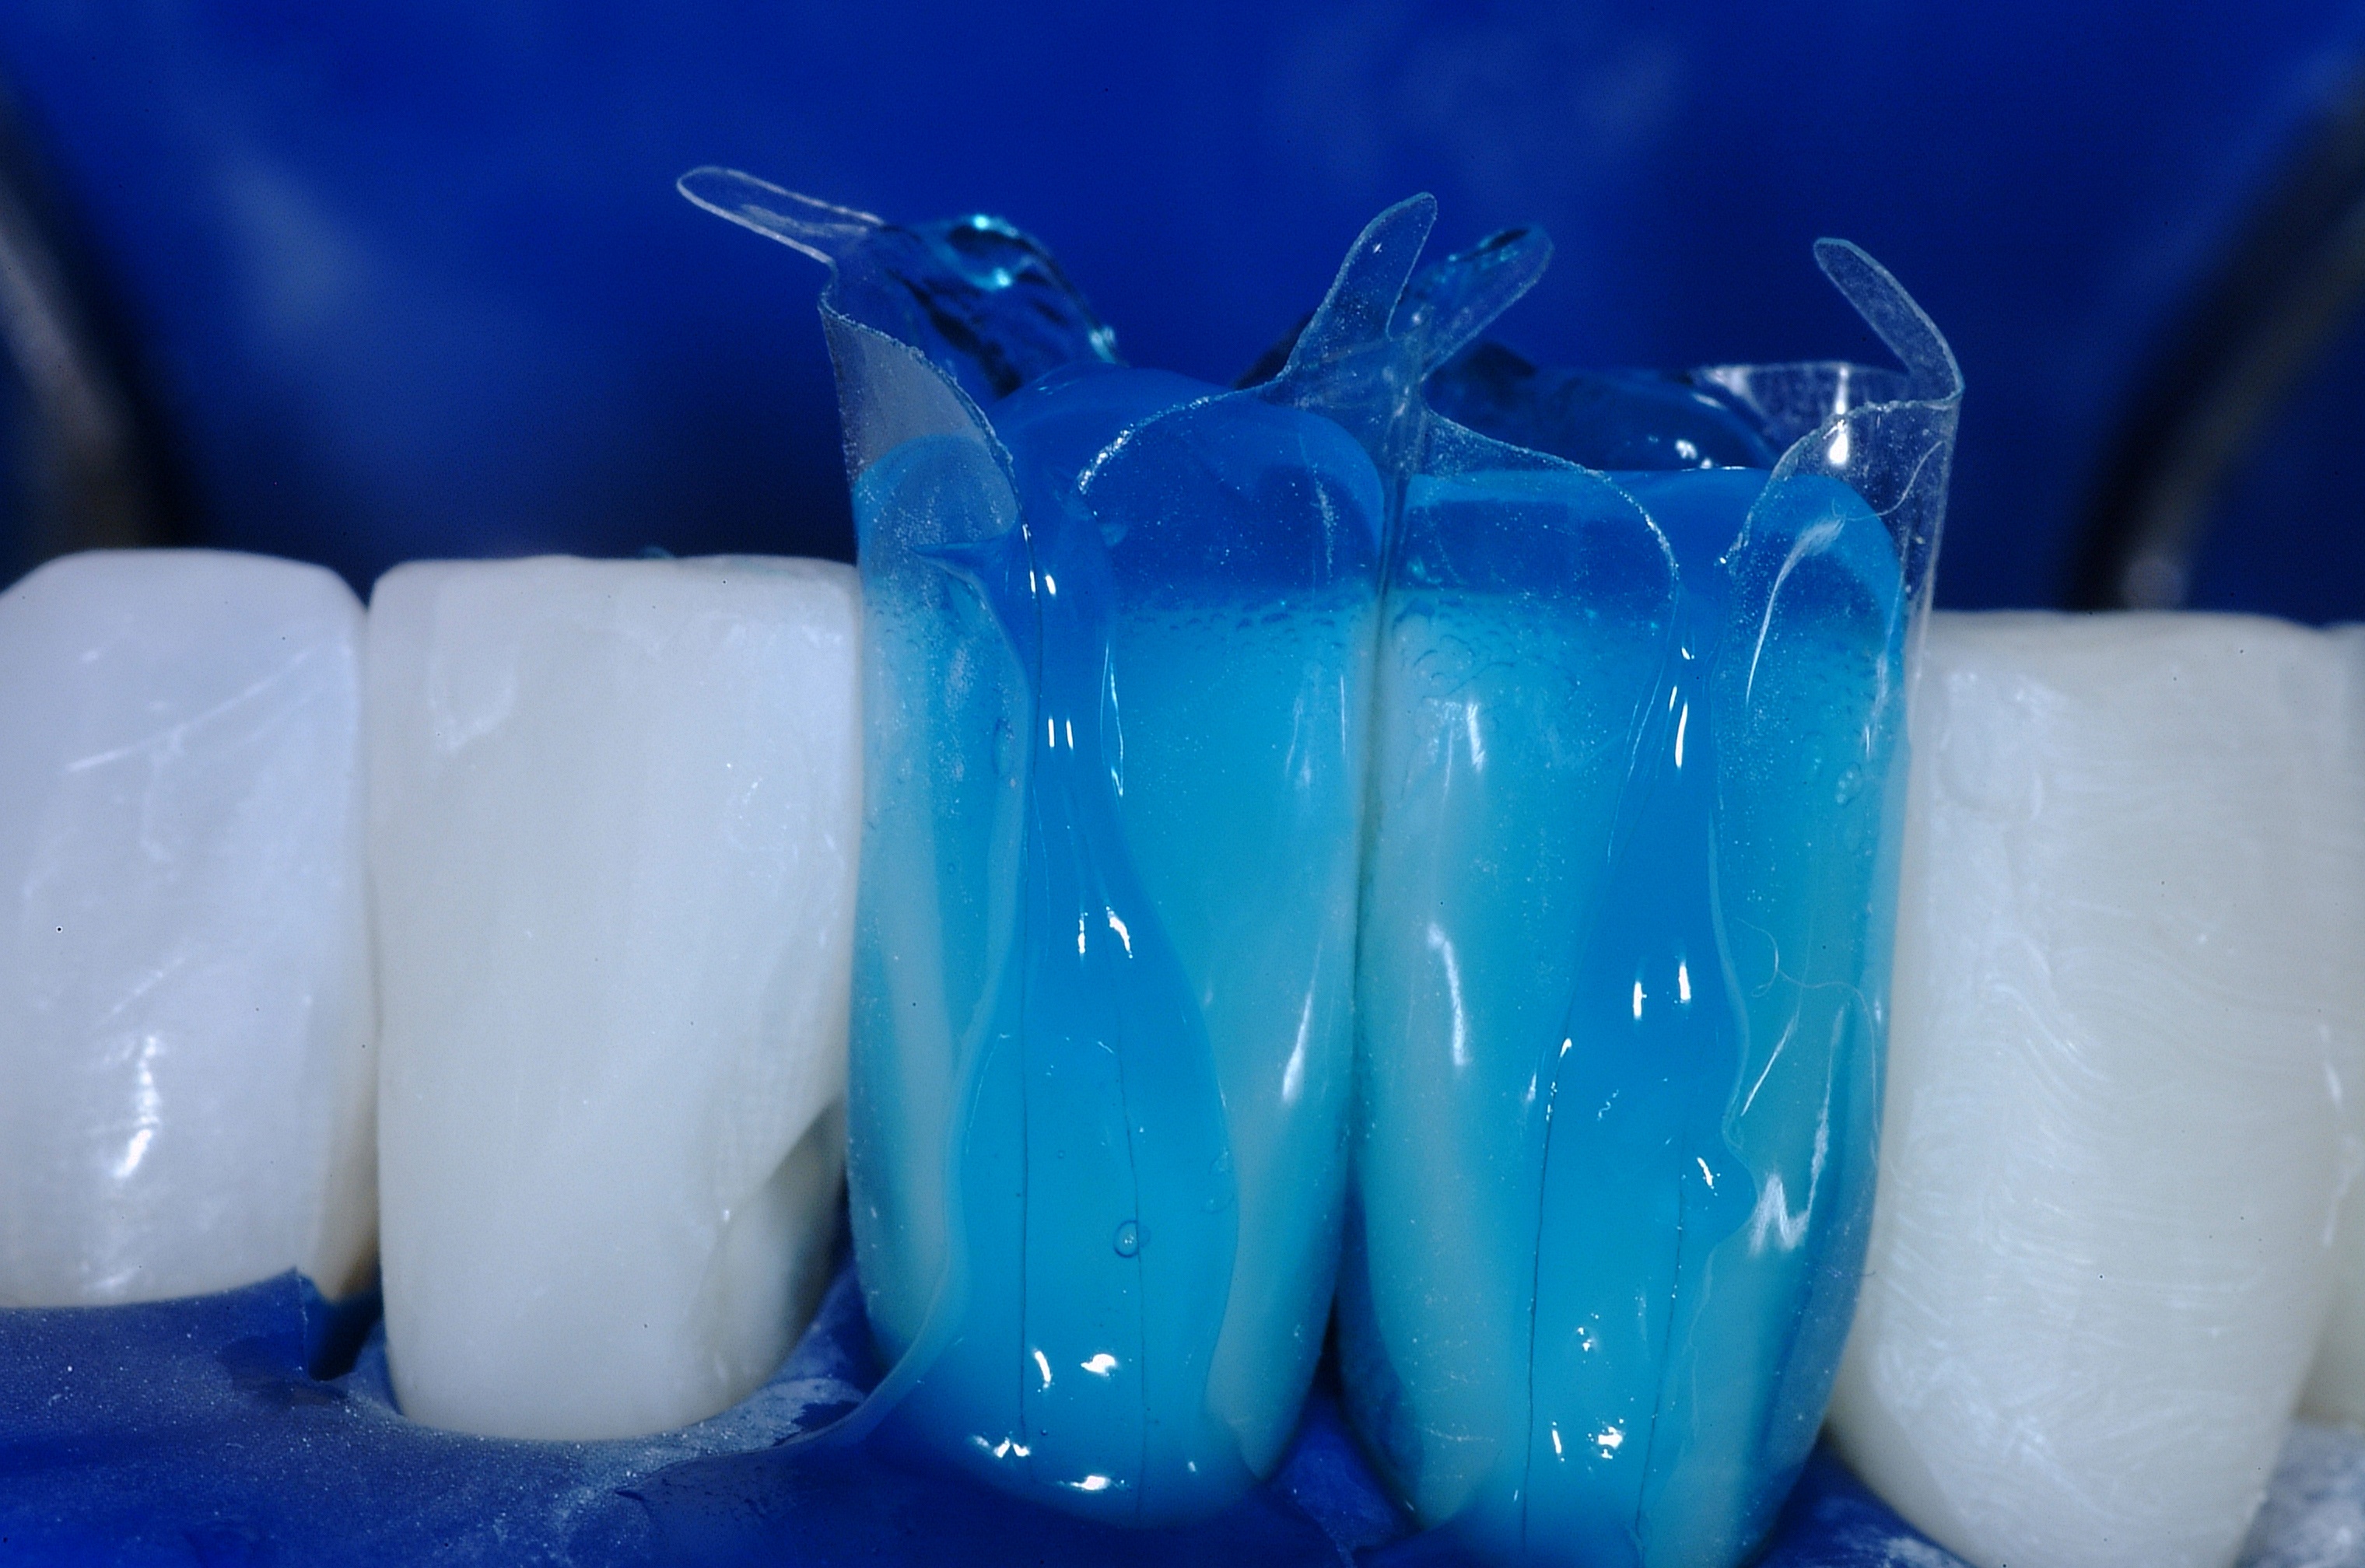
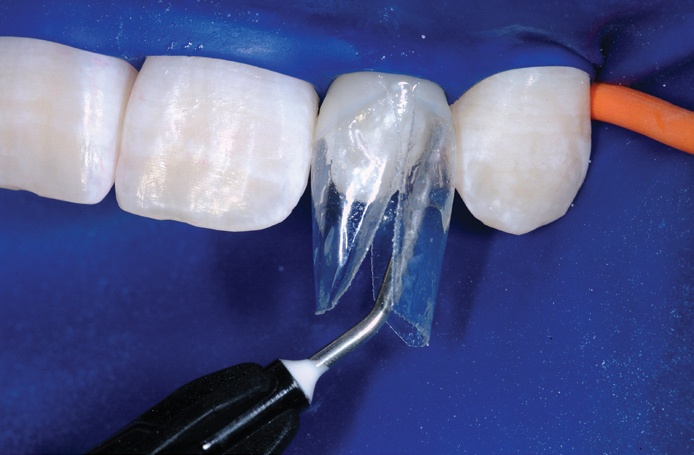 The small cannula of the flowable composite is angled into the interproximal from the facial and lingual sides, before a small amount of flowable composite was placed and light cured.
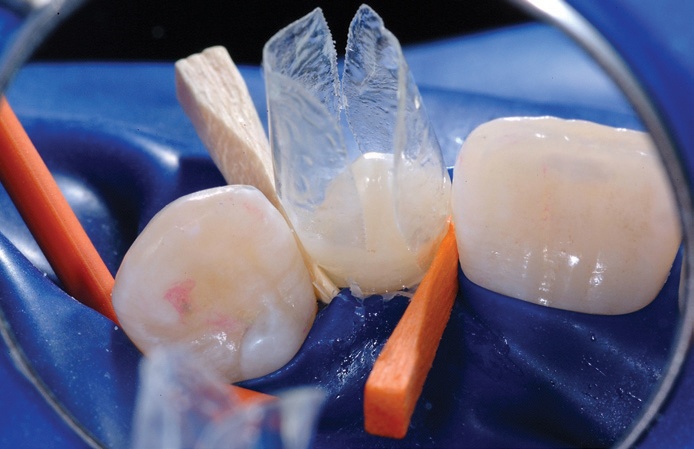
Wedging, Stage 2
An aggressive wedging force with a traditional or a diamond wedge was used to separate the teeth. This is the most effective way to compensate for the thickness of the mylar, for a snug contact.
Once wedged, the remainder of the restoration was then injection moulded, and light cured altogether. Exotic layering with multiple shades and opacities of composite is a luxury that is less critical than creating a void free, contour appropriate restoration.
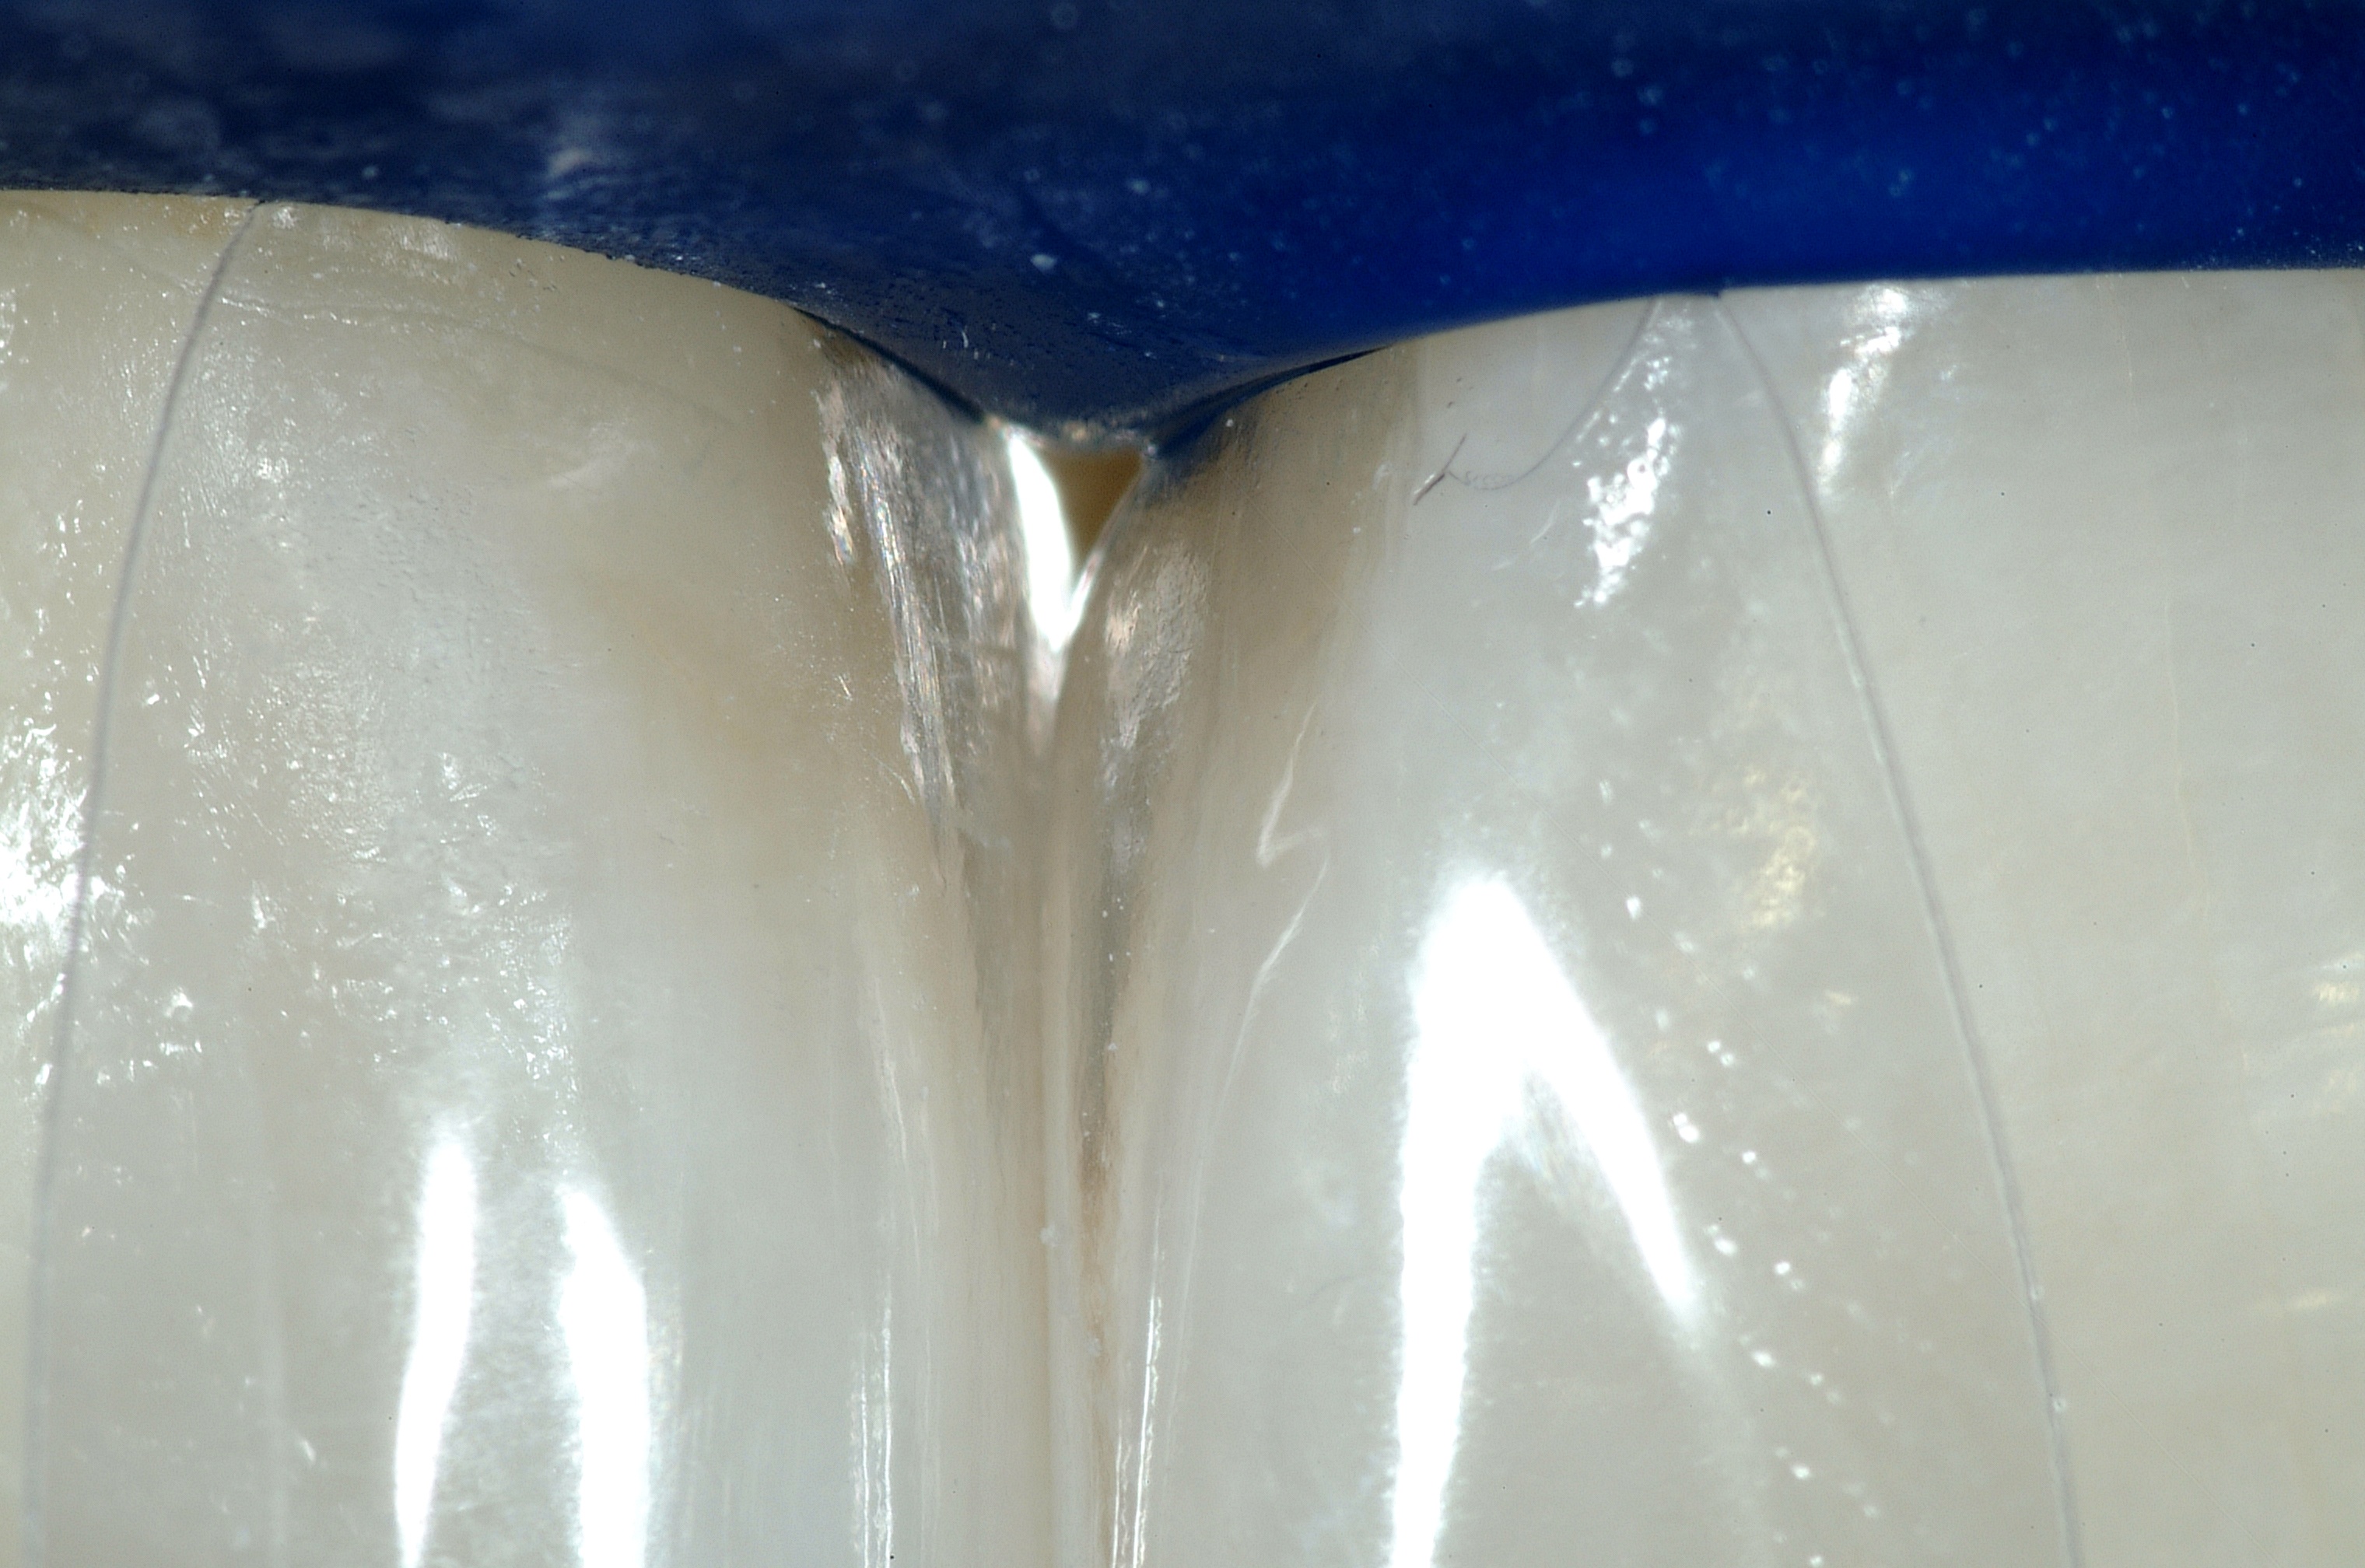
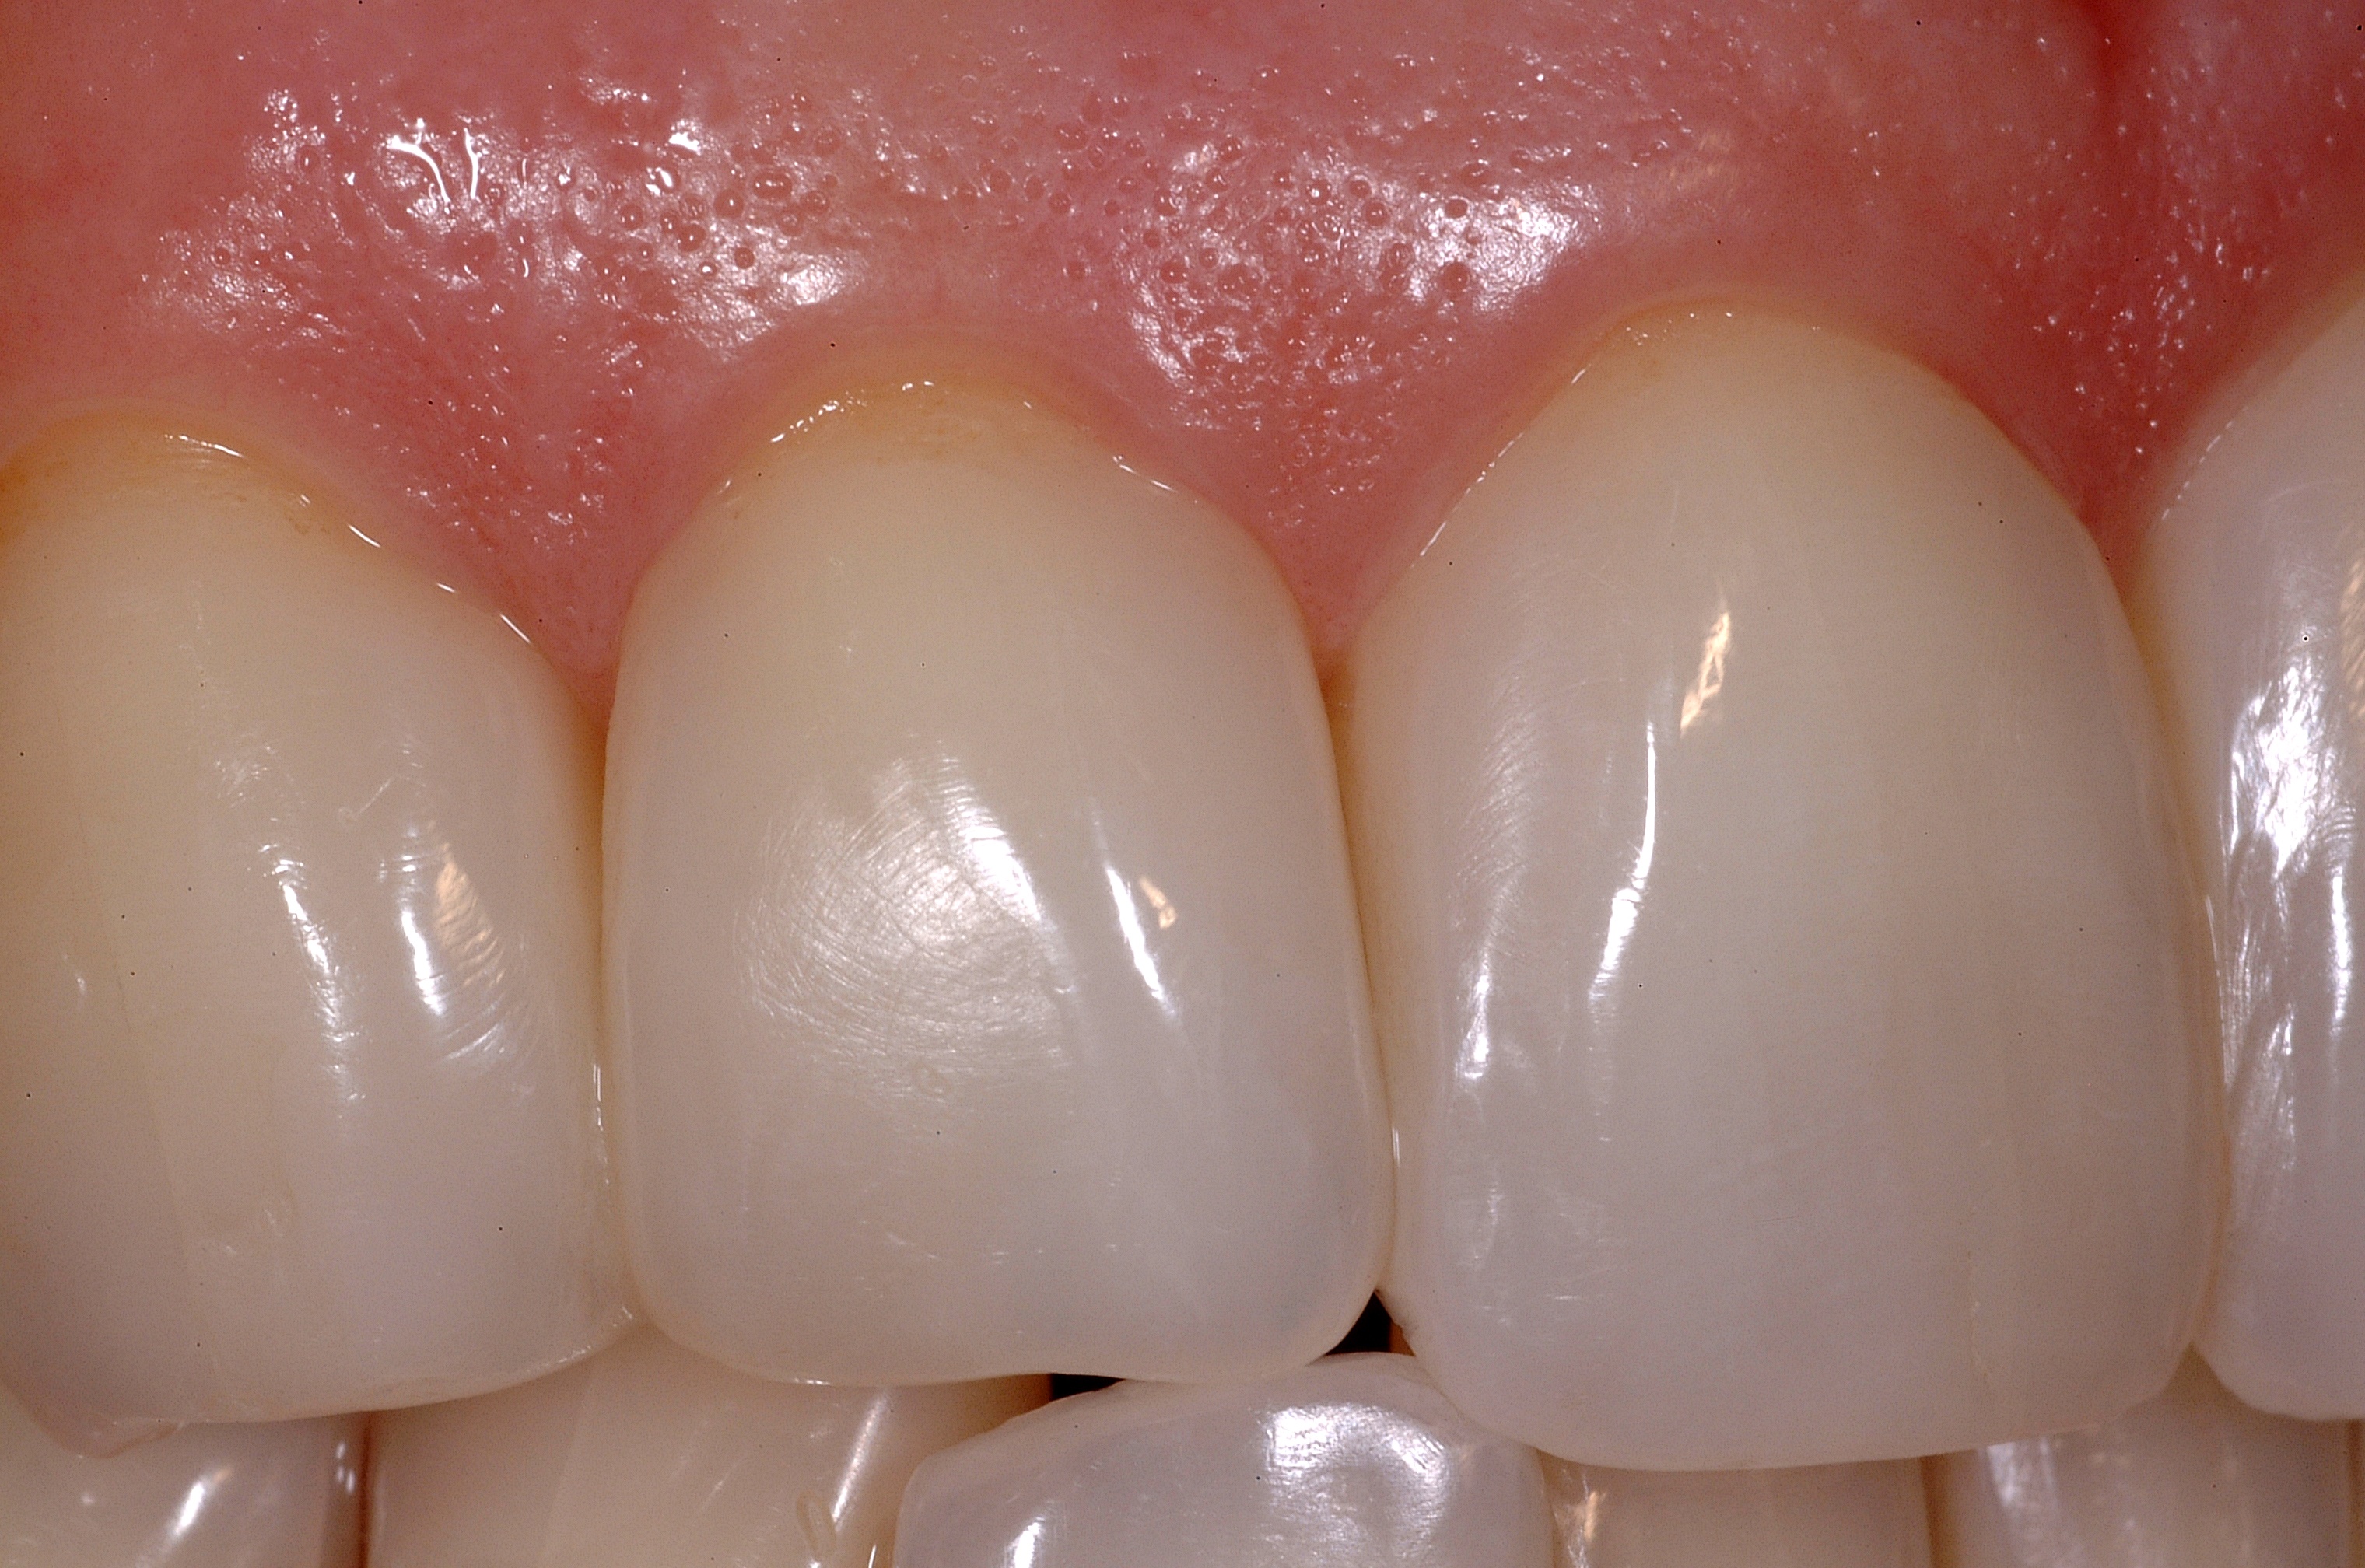
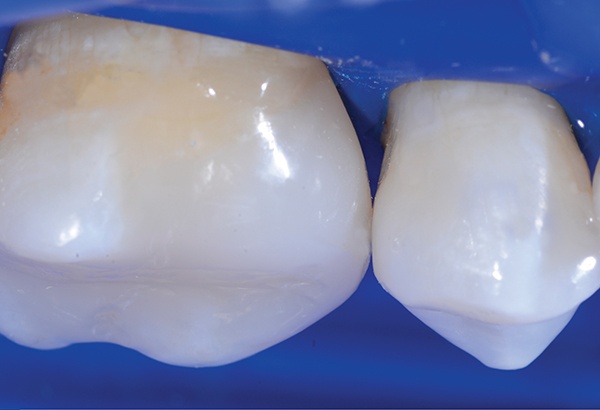
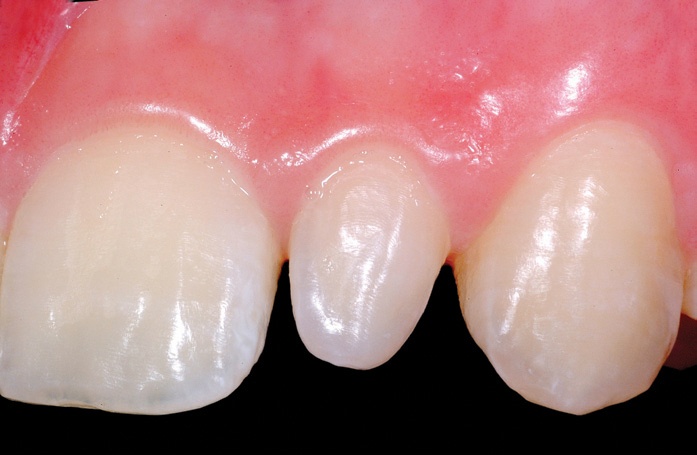
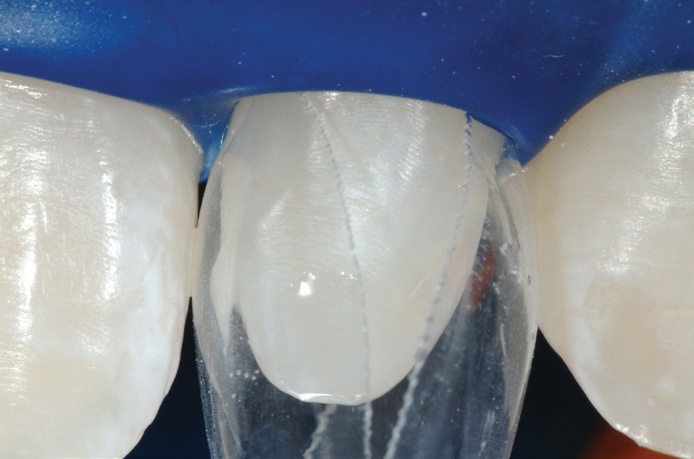
 The Results
The patient was extremely happy with the end results.
High magnification immediate postoperative view of UL2, shows the highly aesthetic junction between the first stage flowable composite and the second stage paste composite. This will not degrade over time and is essentially seamless. After allowing 24 hours for the neighbouring teeth to re-hydrate, the colour match of the treated peg laterals is excellent.

 Discussion
This case explains how three new factors – modern resin chemistry, advanced composite polishing, and the Bioclear Matrix System – are giving clinicians a new dimension in anterior aesthetics.
When combined with procedural advances, like the balanced use of flowable and paste composites and advanced staged wedging technique, direct composites deliver results both the dentist and patient are pleased with.
Achieving an ideal colour match when doing one or two veneers can be extremely challenging, as porcelain is generally very monochromatic. While composites offer a smoother and more natural result that is easy to achieve.
This is because of the contact lens effect that makes colour matching more predictable and long lasting, despite changes to non-restored anteriors due to dehydration and age.
There is also the advantage of the true infinity edge margin, which is only possible with direct composites. This benefits both colour matching and pink aesthetics.
Being able to restore cases such as this with a composite treatment, as opposed to only being able to offer porcelain, allows dentists to offer patients a more economical option without compromising aesthetics. Combining this product with the unique technique described here is recommended for predictable and successful restorative outcomes.
Video Case
In this video case, Dr David Clark demonstrates best practice for treating peg laterals with direct composite and the Bioclear Diastema Closure System.
Dr David Clark – Treating Peg Laterals With The Bioclear Method from Optident Ltd.
The case showcases how the special diastema matrix is seated; the patented shape allows the gingival apron to seat deeply into the sulcus, where it becomes self-sealing. This means that there no wedges are needed to seal the gingival margin.
Dr Clark then presents a two stepped, staged, wedging technique:
1. Tease the matrix away from the tooth; notice how it opens and closes like a trap door. This allows easy insertion of etchant and restorative materials.
2. Place and cure a small amount of composite.
3. Place Diamond Wedges to gently separate teeth so that when the matrices are removed, the contacts will be snug.
4. Tease the matrix back again, and finish placing the composite.
The Bioclear Method helps create ideal interproximal shapes, and in turn eliminates or reduces interproximal finishing.
This means that today’s minimally invasive composite restorations can rival, and even surpass, porcelain veneers.
Treating Peg Laterals and Closing Diastemas Toolkit
When it comes to treating peg laterals and closing diastemas following the Bioclear Method, there are some crucial pieces of equipment you need in your toolkit. With the Bioclear Matrix Anterior Kit you can rely on flexible but strong products that will allow you to offer predictable results every time.
Learn more and purchase the Bioclear Matrix Anterior Kit.
Clinical Tips
For more information and clinical advice when it comes to treating peg laterals and closing diastemas, check out our resources below:
One Man Transforming Modern Dentistry – An Interview with Dr David Clark
Why Dentists Need To Reimagine Restorative Dentistry
Back To Back Diastema Closure – A Video Case
Conclusion
“After 28 years of dentistry I feel like a kid again. I am able to give something that has no compromises on beauty or longevity, or any of the compromises of reduction dentistry. It enables me to satisfy the patient and run a profitable practice.” Dr David Clark.
Historically, there were two options for restoration. These were bonding, which has a number of drawbacks, and porcelain, which looks aesthetically pleasing but has a high physiological and financial cost.
Bioclear Matrix introduces a third method; it boasts most of the advantages of porcelain without any of the disadvantages. Some 20 years on, a tooth treated with the Bioclear Method will not be affected by structural changes, as it would if tooth reduction had been carried out.
Once you begin to explore the Bioclear Method, rather than just the Matrix, you will start to see new opportunities. As well as being able to help patients feel better about their teeth, you will also be capable of slowing down the effects of wear.
The Bioclear Matrix philosophy will challenge the way all dentists think and feel about restorative dentistry, introducing an exciting new perspective. Cases that could not previously be treated, or could only be treated aggressively, now have a wealth of new possibilities.
If you position yourself as a very patient centred dental practice, where your patients’ needs are met by conservative, aesthetic and long lasting treatments, people will seek you out.
It is what patients are increasingly demanding today – and now there is a way to meet these needs.
.png)
SOURCES
1 Kurth J, Kokich V. Open Gingival Embrasures after orthodontic treatment in adults: prevalence and etiology. Am J Orthod Dentofacial Orthop 2001; 120:116-123)
2 Cunliffe J, pretty I. Patients’ ranking of interdental “black triangles” against other common aesthetic problems. Eur J Prosthodont Restor Dent. 2009 Dec; 17(4):177-81
3 Albashaireh ZS, Khader YS. The prevalence and pattern of hypodontia of the permanent teeth and crown size and shape deformity affecting lateral incisors in a sample of Jordanian dental patients. Community Dent Health. 2006;23(4):239-243.