Here, Nik Sethi talks us through the method and products used to place a first and second molar lithium disilicate crown, including crown lengthening and root canal procedures...

Nik Sethi qualified from King's College London in 2009. He has a Master of Science degree in aesthetic dentistry, also at King's College London. Since then, he has established himself at a private practice in London and has developed a keen interest for restorative treatment and endodontics.
Nik has attended several highly respected courses on restorative dental training, including a one year course with Tidu Mankoo and Basil Mizrahi. He is also on the executive council of the British Academy of Aesthetic Dentistry and a full member. Nik provides regular teaching courses on composite restorations and is regularly featured in Dentistry Magazine, writing a series of articles aimed at educating younger dentists.
Step 1: Diagnosis and treatment plan
.bmp)
.bmp)
The patient, aged 40, presented with persistent throbbing pain and tenderness to bite on his lower left side. He also complained of generalised swelling of the gums and admitted he hadn't been to the dentist for around 6-8 years. Medically he was fit with no allergies.
Upon examination, generalised gingival inflammation was present and the patient had poor oral hygiene. The lower left 1st molar had extensive caries, which was also present sub gingivally. Our initial concern was that the tooth may need extraction.
The 2nd molar had a ten year old root canal treatment with an amalgam Nayar core, but there were signs of cracking on the marginal walls of the tooth and it was therefore a high fracture risk.
.bmp)
The radiographs taken confirmed a deep distal radiolucency into pulp. The level of the radiolucency was very close to the bone crest level. The 2nd molar had an excellent root canal treatment and the amalgam Nayar core appeared marginally sound.
The treatment plan was discussed with the patient and included:
- Initial caries removal of the 1st molar and assess the restorability of the tooth. The patient was aware of the possibility of losing the tooth but was very keen to try and keep it
- Accepting the current amalgam core on the 2nd molar
- Stabilising the periodontal health through non-surgical debridement
- A cuspal coverage full crown to reduce the fracture risk
Step 2: Preparation
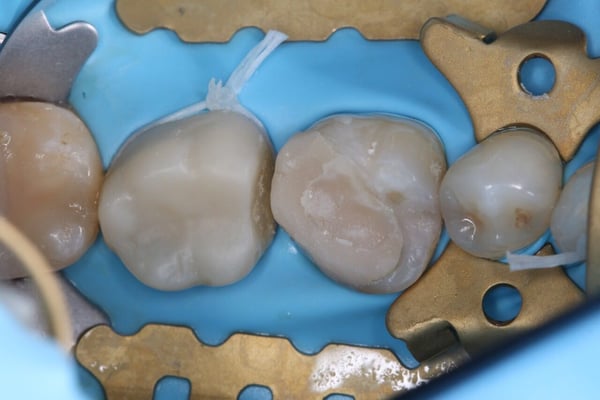
Provisional crown in place on the LL7, temporary filling in place on the LL6.
Root canal treatment completed on LL6 ready for preparation.
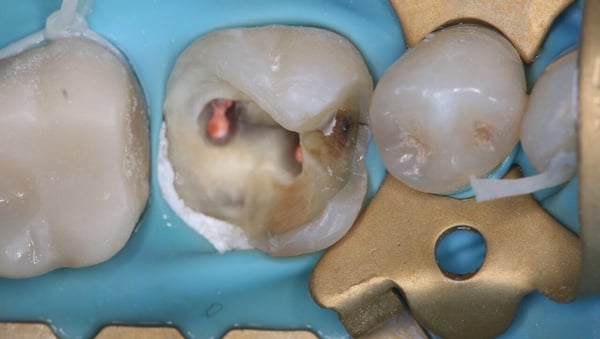
After initial removal of the caries, the cavity was extensive and into pulp. However, I felt the tooth was restorable via root canal treatment and crown lengthening to improve the resistance retention form and avoid a post. Initial extirpation of the tooth was provisionalised with glass ionomer. The 2nd molar was prepared for a full coverage metal ceramic crown with a metal 360 margin - this would preserve as much tooth enamel as possible cervically.
Step 3. Restoration
Surgical crown lengthening was then completed, and after 3 months the root canal treatment was carried out on the 1st molar.
After removal of the glass ionomer and placing an adhesive composite core filling, the preparation for a full ceramic crown was complete.
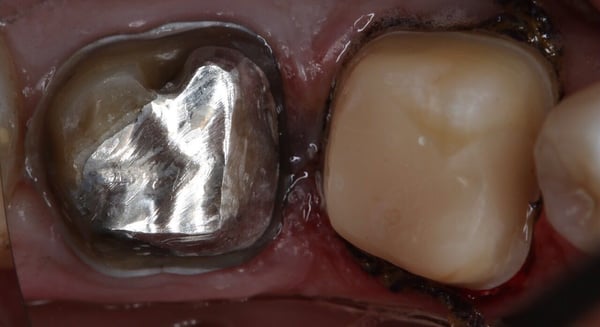
LL6 restored with core filling and both preparations completed for final restoration.
Given the extent of the cavity, isolation would have been impossible had it not been for the use of a Hallerklammer clamp. This clamp is designed to pull the dam down into the vestibular areas and help expose the margins of the preparation. Isolation is reinforced with PTFE tape which is almost used as a retraction cord for the dam.
"The Hallerklammer created a stress free environment and allowed the placement of a circumferential matrix band in order to build up a composite core filling."
The next step was for the preparation margins to be refined for both molars.
Taking accurate impressions of these deep margins was helped by two factors: the previous crown lengthening surgery; and the use of Viscostat (ferric sulphate haemostatic agent) and Ultrapak cord firmly placed around the sulcus via a double cord technique. The latter kept the gingival tissues retracted away from the margins and controlled the saliva and any minor bleeding.
The two teeth were provisionalised with bisacryl temporary crowns made from a pre-op putty index.
At the fit appointment, the isolation was repeated using a standard clamp and the Hallerklammer system, and the fit of both crowns was checked. The 1st molar was restored via an adhesively cemented lithium disilicate crown using the Bisco duolink dual cure system, including their silanation protocol of the fit surface.
The 2nd molar was restored via a metal ceramic crown with a 360 degree metal margin, cemented with a glass ionomer cement. The excess cement was removed and the occlusion and contacts were checked. Easy access with interproximal brushes was ensured.
Final restoration result
“Once the treatment had finished, the patient was very satisfied with the result.”
-1.jpg?width=600&name=image2%20(1)-1.jpg)
.bmp)
The blend of the aesthetics achieved from the lithium disilicate crown to the adjacent teeth was a far more natural match than the metal ceramic on the 2nd molar. However, the final result was adequate and as conservative as possible, given the extreme initial presentation.
Optident products used in this case:
Click the links above to view the pages or view the Optident Products page.