Dr Suril Amin, Lead Clinician and Practice Owner at Sensational Smiles, Sutton explains how Ribbond, the number one fibre reinforcement has been an invaluable tool in his practice.
What is Ribbond?
Ribbond is a high strength, bondable fibre that can be used in a variety of clinical situations to improve strength and longevity of restorations. The fibres are extremely durable, due to the ultra-high strength composition which means it can be used to reinforce composite. This allows the material to be used for the construction of direct restorations that exhibit superior properties that are less resistance to fractures/failures. Due to the translucent properties, Ribbond also demonstrates excellent aesthetic properties and is invisible once bonded in.
Ribbond is routinely used in clinical practice for:
- The construction of temporary direct bridges.
- Problem solving.
- Splinting periodontally involved teeth.
- Strengthening of acrylic dentures.
This blog will discuss some clinical scenarios that illustrate the usefulness of Ribbond.
Ribbond is an excellent solution for temporary chairside bridges
The most common clinical situation where ribbon is used is for the construction of temporary direct bridges. There are a few reasons why we prefer chairside bridges as opposed to laboratory made:
- Cost effectiveness - we normally charge around £250 for a single unit temporary bridge. By the time you factor in the laboratory fee for bridge, you would have to pass the extra cost to the patient. Making a chairside bridge is very cost effective. This works favourably when presenting large treatment plans as sometimes you want to keep the cost reasonable to ensure case acceptance.
- No need to take any pre-operative scans, photos, or impressions prior to the visit. Getting the patient straight in for the procedure, without having to take any pre-operative records, negates some of the extra time it takes to make the temporary yourself and also makes it much easy to plan the dairy. There is no need to book an extra appointment prior to the bridge fit.
- Gives you more versatility. If a patient comes in and they need treatment on the day, you have the flexibility of treating their problem and letting them walk out with a fixed tooth that very day.
- Most laboratory temporary bridges are made either from acrylic or composite. The issue with composite is that it’s not strong enough when used alone and needs to be reinforced with something like Ribbon. With acrylic, the issue is bonding. You are repair acrylic well using composite resin in some clinical situations but getting a thin acrylic wing to bond to a tooth is very difficult.
Case Reports:
Case 1 – Emergency Appointment
A patient presents with severe pain in an UR2 post-crown - a diagnosis of acute apical periodontitis was made, and a vertical root fracture was suspected. This was a difficult situation as ideally the tooth needs to be extracted on the day. If you did extract, how would you temporise? One way would be to take an impression and persuade your laboratory to make you a quick single tooth denture, but this normally takes at least 24 hours due to the heat cure process.
An alternative option would involve taking an impression, the possible use of anti-biotics, and to see the patient again the following week for extraction and the fitting of an indirect temporary bridge.
The patient wanted the tooth out on the day due to the severe pain. She also had time constraints and availability was an issue. In addition, the patient was worried about having a missing tooth for any period of time.
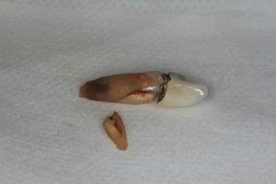
In the end, the tooth was taken out and a temporary bridge was made using composite, reinforced with Ribbond. This meant that we could solve all immediate issues in that one visit. The long-term plan was to allow for 4 months healing, followed by a permanent bridge to restore the missing gap. The tooth did in fact, have a vertical root fracture as you can see from the photograph below.

Case 2 – A temporary bridge
The patient presented with a missing tooth and was due to have implant placement. The implant was unable to be immediately loaded and the patient did not want to wait for 6 months until the final implant crown was fitted. The patient did not like the idea of a removable denture. The implant was placed, and a fixed temporary bridge reinforced with Ribbond was made.
Case 3 – Problem solving
This patient was due to have an implant bridge restoring the missing teeth UR3- UR3. The patient had an existing large span bridge from the UR6 – UL3.
The implants could not be loaded immediately, and the patient refused to have a denture. A large temporary bridge was made using Luxacrown (DMG) from the UR6 – UL4. This extremely large cantilever bridge that was completely unsupported on the left side was bound to experience catastrophic failure at some stage of the 6 months we required the bridge to last. Although, we could increase the thickness of the pontics to increase strength, there was a limit due to occlusal interferences and speech issues.
Ribbon was bonded to the palatal surface from the UL6 to the UL4. The UL4 was bonded palatally on the temporary bridge for added strength and the use of the UL4 wing added support and retention. The patient was advised to have a soft diet and to try to restrict function to the posterior teeth. The bridge did, in fact, survive for the full 6 months thanks to the aid of Ribbond.
Technique
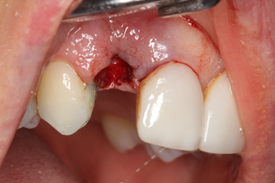
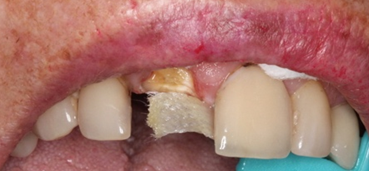
This patient presented with broken tooth UR1 and was looking for an implant as a final solution. The patient also requested a temporary solution to improve aesthetics.
Ideally a CT scan would have been taken first, to aid proper planning however, due to time constraints this was not possible.
I did not want to extract the tooth at that visit as there is always the potential the implant could potentially be immediately placed. Immediate loading was perhaps not possible due the lack of posterior support.
Although an implant assessment and CT scan was booked, the patient wanted the problem resolved on the day during the 45minute appointment.
Options we discussed were:
- Grind down the tooth, take an impression and fit a denture in 2 days’ time. The patient did not want this due to the timescale involved.
- Temporary post crown – this option was not favourable as the tooth was due to for extraction. This meant increased costs for the patient and wasted time for the provider.
- Temporary direct bridge reinforced with Ribbond – the patient wanted to walk out with tooth on the very same day. I wanted something versatile whereby it fixed the immediate issue but there was the option to keep the restoration during the implant healing phase too. This was especially important as the probability of immediately loading was unlikely.
- Remove veneer UL1, prepare tooth and make conventional cantilevered bridge. This option would be too destructive and would increase costs unnecessarily. The limited time constraints of appointment also made this option unfavourable.
The patient opted for option 3.
Stages
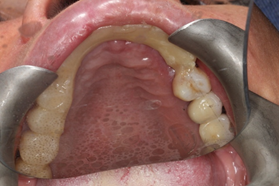
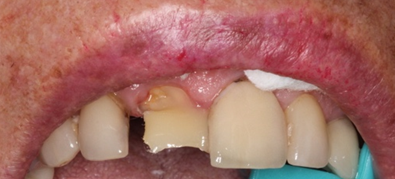
Step 1 – The tooth stump was ground down to accommodate space for the pontic. A perio-probe was used to measure the distance of the ribbon needed. Care was taken not to cut the ribbond piece too small or too long as this causes issues. If the piece is too short you will either have a lack of material on the abutment (which results in a decreased bond strength) or there will be a deficiency of ribbon occupying the pontic which may result in decreased strength resulting in an increased risk of fracture.
Step 2 – Soak the Ribbond in your choice of bond. Do not light cure at this stage.

Step 3 – etch and bond the Ribbond piece to the abutment. abutment. Use flowable composite on the ribbon and tooth to bond.

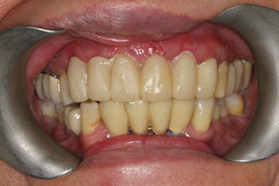
The photographs above show the ideal positioning as sufficient thickness is needed on the labial and palatal surface. This gives the pontic good strength as it will be located right in the middle.
If the Ribbond is placed too palatal, there is the possibility of running into trouble later when checking occlusion. If adjustment is required, sometimes the palatal fibres are inadvertently penetrated causing further weakening. Another issue is the fibres are difficult to polish which can then irritate the patient.
Step 4 – Build the pontic out with flowable composite. Normal composite can then be used to give the pontic sufficient strength. Heated composite is preferable as its easier to manipulate and has an increased depth of cure.
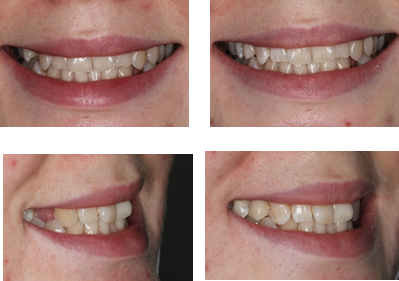
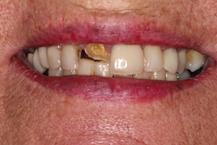
The finished result
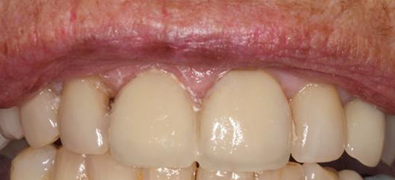
In some instances, a putty matrix can be used with a temporary crown material like Protemp or Luxatemp – it speeds up the process as you are not having to build the pontic freehand. If using this method, a palatal channel can be cut into the pontic and built out using composite. This ensures the Ribbond runs through the middle of the pontic as mentioned previously.
In terms of occlusion, treat the temporary bridge just like a normal Maryland bridge, but allow for extra protection. Ensure no force onto the pontic. Forces onto the wing are acceptable.
Conclusion
As you can see Ribbond is an essential tool for any general dental practice and your patients will be happy that you can provide extra services that many other dentists will not be able to offer.
Ribbond is available from Optident at Henry Schein! Click the button below to shop today or call 01943 60 50 50

Author: Dr Suril Amin, Lead Clinician and Practice Owner at Sensational Smiles, Sutton